

If you want to elevate your PowerPoint presentation skills and truly impress your audience, mastering animation techniques is a game changer. Whether you’re presenting a summer-themed project, showcasing your favorite travel destination, or working on any creative slide deck, adding dynamic animations, video backgrounds, and smooth motion paths can bring your slides to life. This comprehensive guide will walk you through creating an engaging looping sticker animation with a captivating video background and wavy text effects, all within Microsoft PowerPoint 365.
By the end of this tutorial, you’ll know how to incorporate video backgrounds that play automatically, add animated text with stylish wave effects, and animate multiple illustrations with seamless looping motion paths. Plus, you’ll learn some handy tips to keep your presentation smooth and professional. Let’s dive into the magical world of PowerPoint animation and boost your PowerPoint presentation skills!
Table of Contents
- Gathering and Preparing Your Assets
- Creating a Looping Video Background
- Designing Animated Wavy Text
- Adding and Animating Summer Illustrations
- Tips for Smooth Animation Playback
- Frequently Asked Questions
- Conclusion: Take Your PowerPoint Presentation Skills to the Next Level
Gathering and Preparing Your Assets
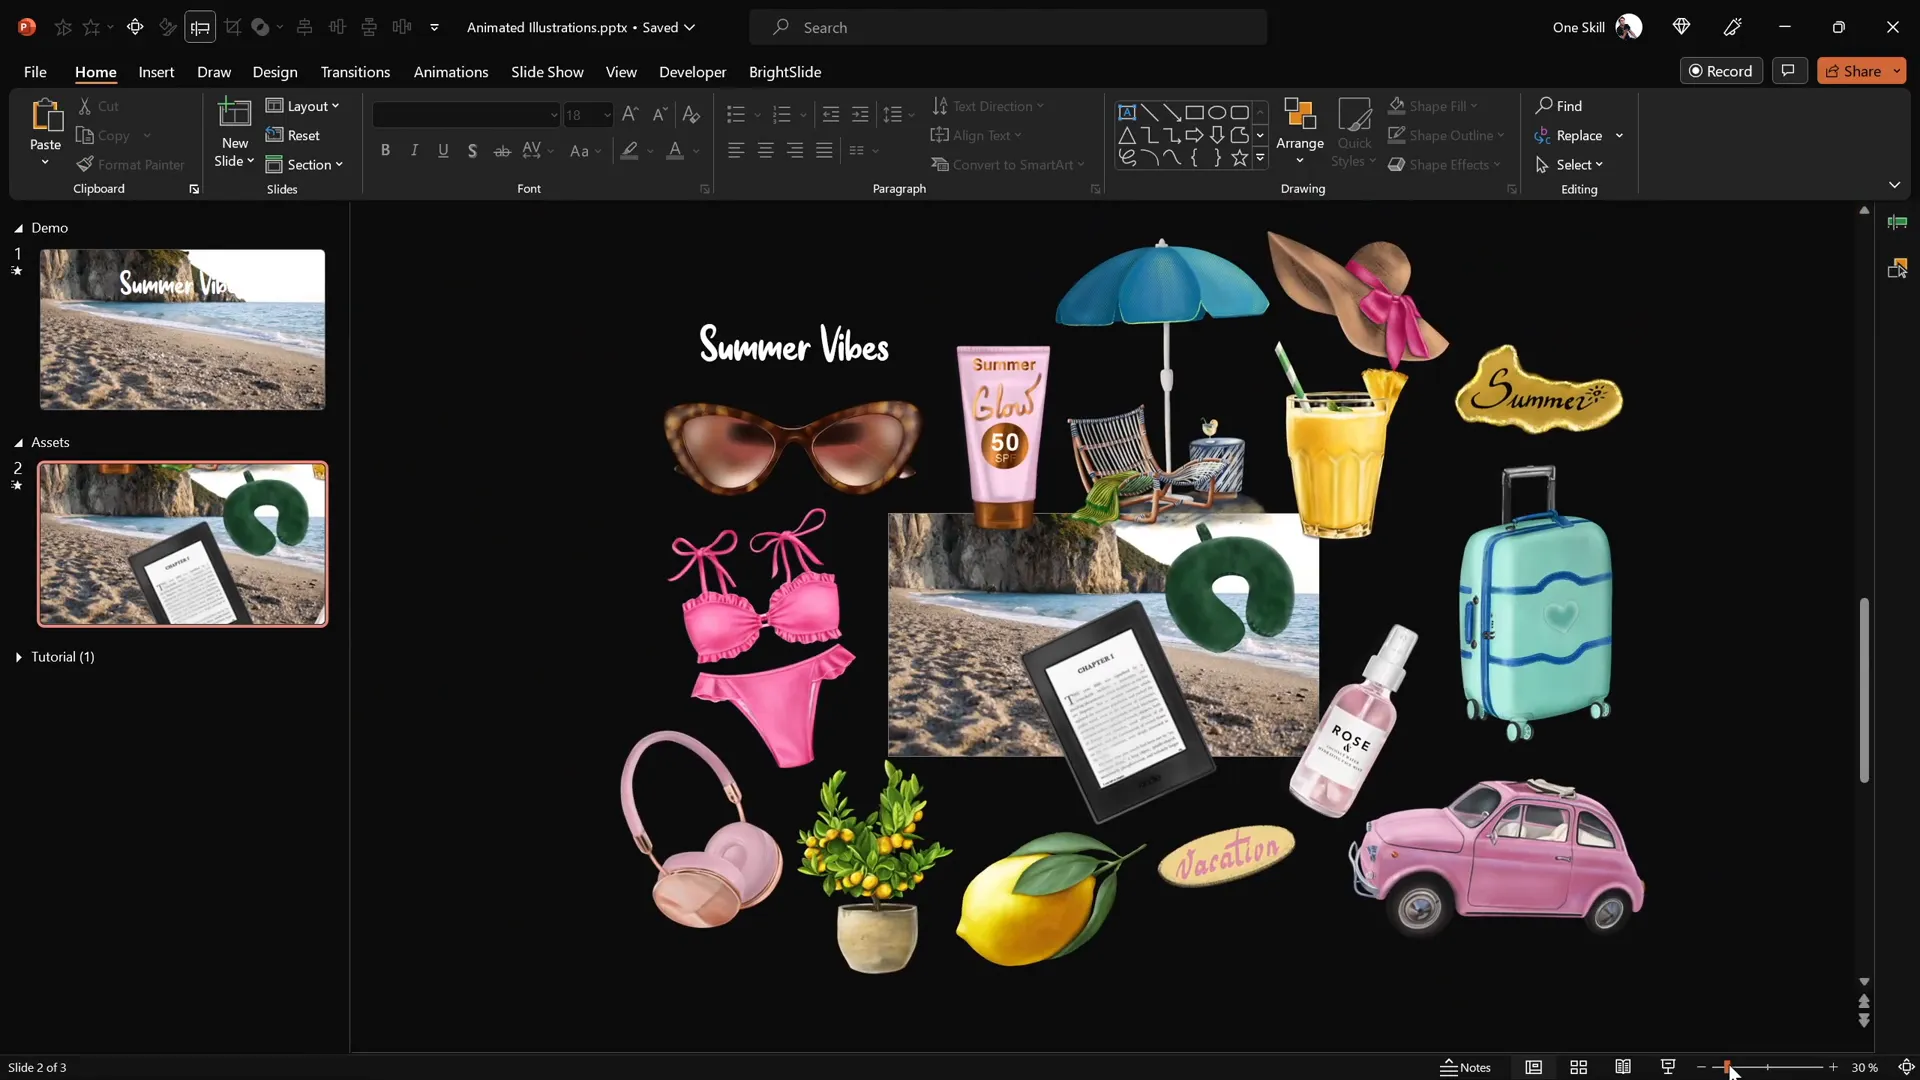
Before diving into PowerPoint, it’s essential to prepare the visual assets you’ll be animating. For this tutorial, a collection of beautiful summer-themed illustrations was used, created by the talented digital artist Raminta. These illustrations include sunglasses, headphones, lemons, stickers, luggage, cars, a Kindle reader, a cocktail glass, sunscreen bottles, and umbrellas—all perfect for evoking a vibrant summer vibe.
What makes these assets especially valuable is that they come in PNG format with transparent backgrounds. This format allows you to layer and animate them seamlessly on any slide without worrying about unwanted backgrounds interfering with your design.
Consider the following points when gathering your assets:
- Format: PNG with transparent backgrounds is ideal for layering.
- Theme: Choose illustrations or images that fit your presentation’s message and mood.
- Quality: Use high-resolution images to ensure crisp visuals on large screens.
- Licensing: Always verify usage rights, especially when using assets from external creators.
For those interested, Raminta’s summer illustration collection is available on Etsy, and now is a great time to grab these charming hand-drawn assets for your own projects.
Creating a Looping Video Background
Adding a video background can instantly make your slides more dynamic and immersive. Here’s how to set up a looping video background that starts automatically when the slide loads:
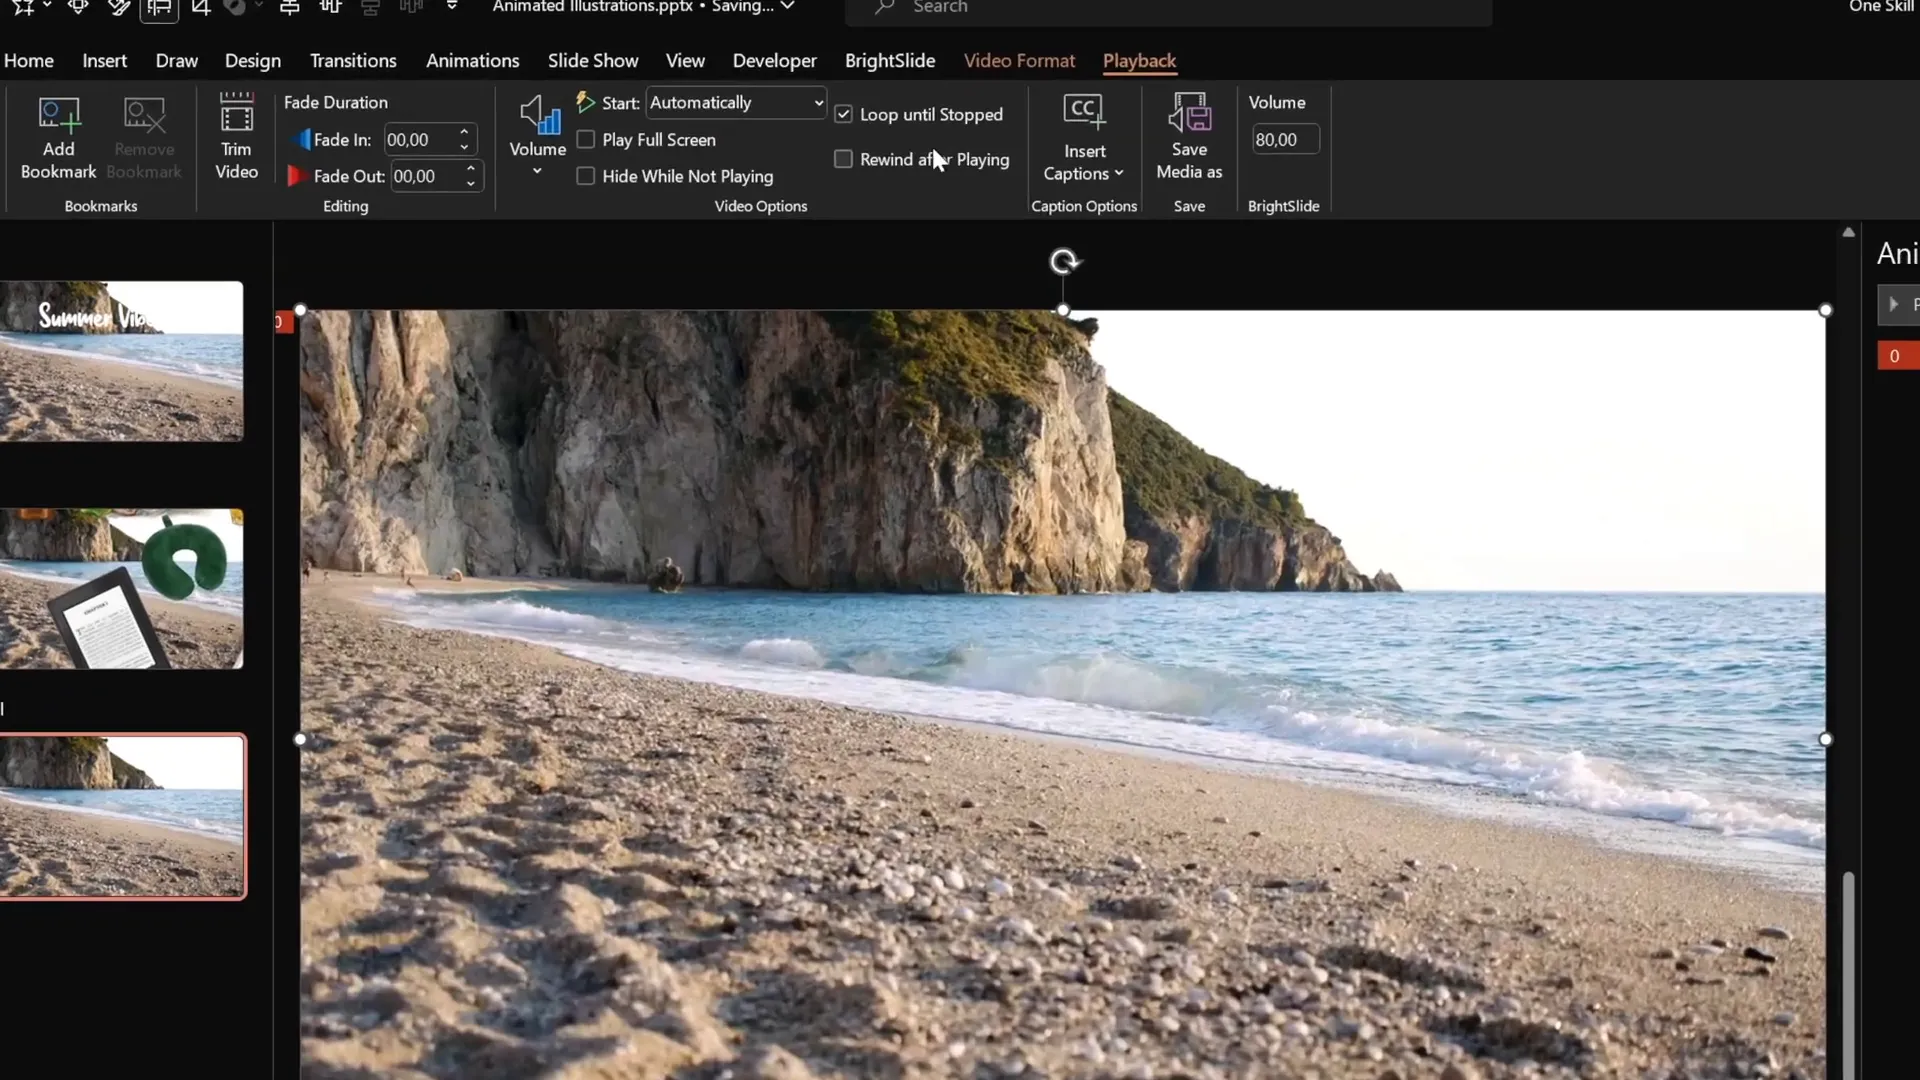
- Insert the Video: Start with a blank slide and paste your downloaded video file onto it. For this tutorial, a beach shoreline video from Artlist.io was used to create a relaxing summer ambiance.
- Set Playback Options: Select the video, then add a Play animation. Change the animation trigger to Start With Previous to ensure the video plays as soon as the slide appears.
- Enable Looping: In the video playback options, check the Loop Until Stopped box. This keeps your video playing without interruption throughout the slide’s duration.
- Hide Media Controls: To avoid distracting video controls from appearing during your presentation, go to Slideshow settings and uncheck Show Media Controls.
- Prevent Video Clicks: If you notice the video resetting when clicked, you can cover the entire slide with a transparent rectangle shape to block mouse clicks on the video. Set the rectangle’s fill transparency to 100% and remove any borders.
This setup creates a clean, professional video background that plays seamlessly throughout your presentation, setting the perfect tone without distracting your audience.
Designing Animated Wavy Text
Text animations add personality and focus to your message. The title of your slide is the first thing your audience will notice, so making it eye-catching with animation is a smart move. Here’s how to create a wavy animated title using PowerPoint’s built-in animation tools:
- Insert Your Text Box: Type your slide title using a stylish font—Sweet Purple at font size 115 was used for a bold, playful look.
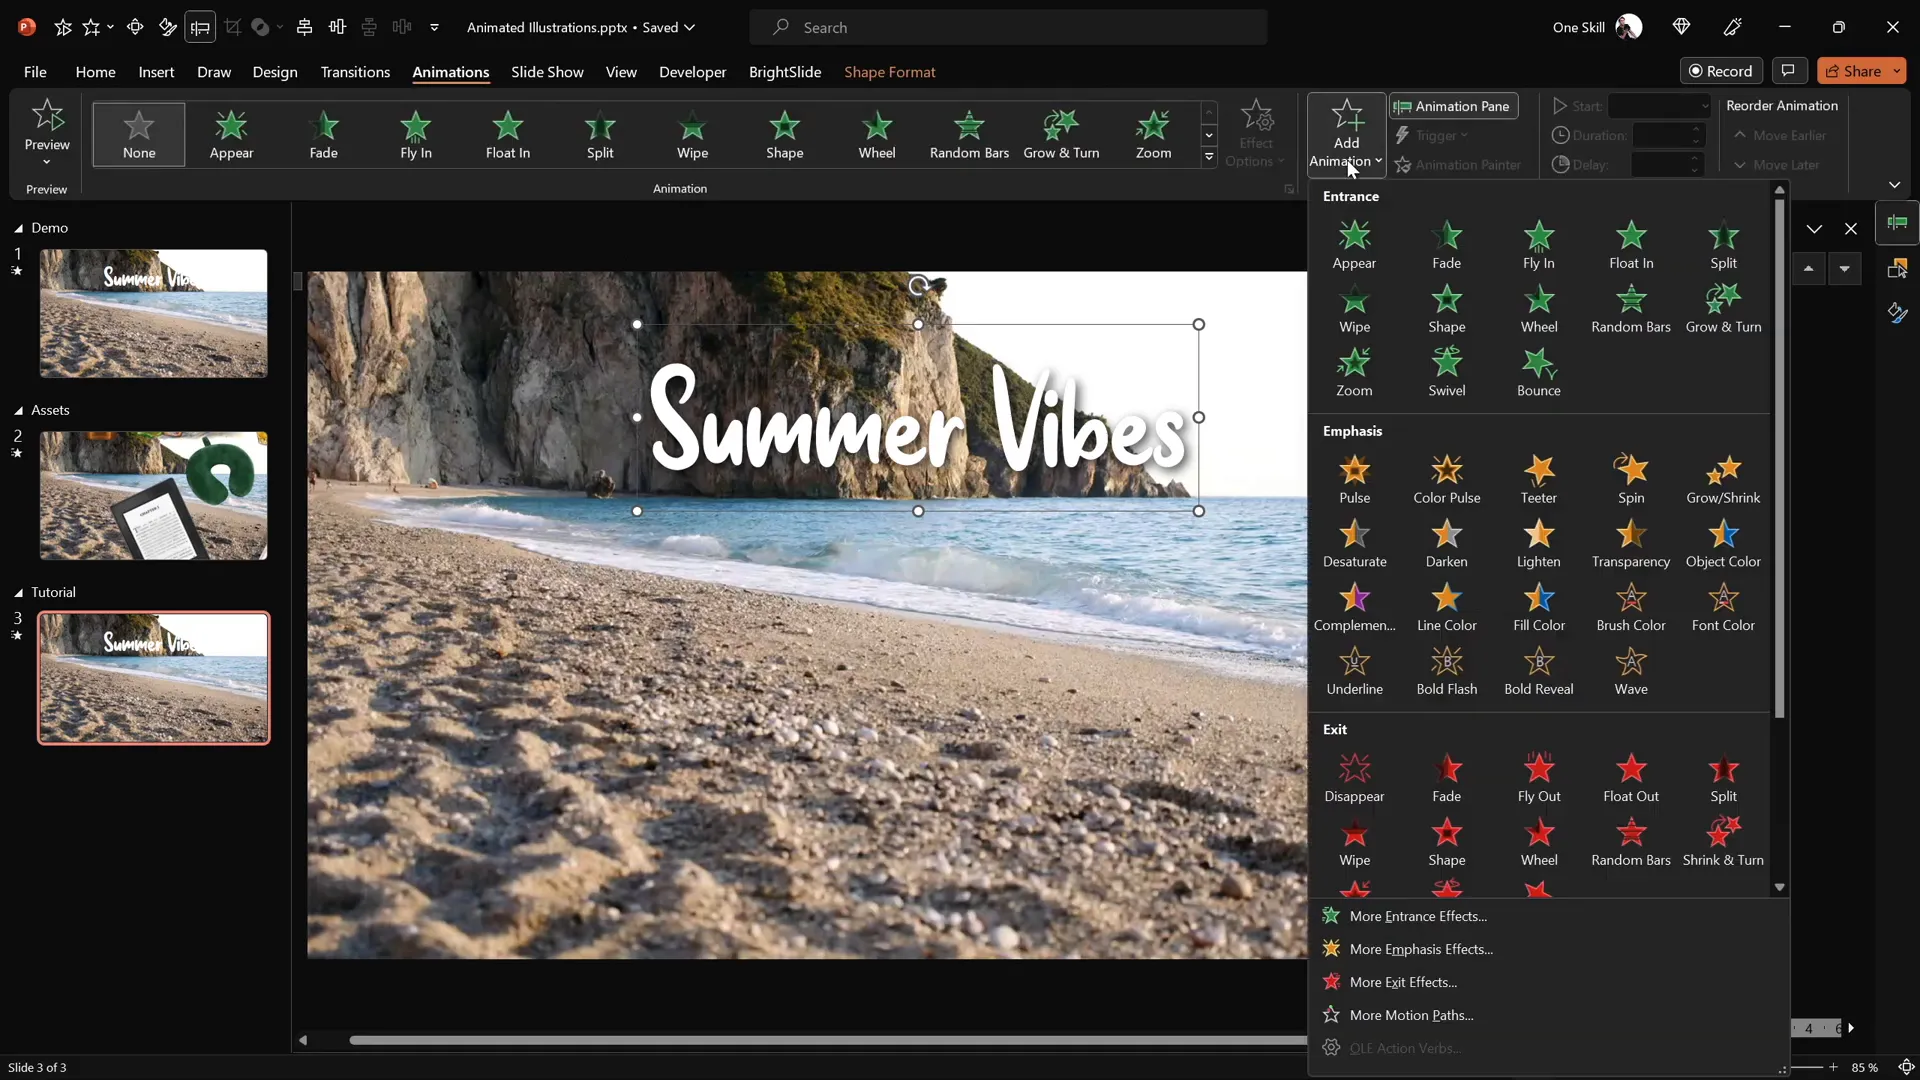
- Apply Basic Zoom Entrance Animation: Select the text box, go to Animations, then Add Animation. Choose the Basic Zoom effect from the entrance animations.
- Animate By Letter: In the animation settings, set the effect to animate By Letter with a delay of 10% between letters. This creates a cascading zoom effect letter by letter.
- Add Wave Animation: Add a second animation, the Wave effect, to the same text box. Set it to start With Previous and adjust the duration to 2 seconds with a 5% delay between letters.
- Loop the Wave Animation: In the timing settings, set the wave animation to repeat Until End of Slide for continuous waving motion.
- Preview and Adjust: Test your animations in slideshow mode and tweak the wave height and timing if desired.
This two-step animation approach makes your title pop with a zoom-in effect followed by a gentle wave motion that loops continuously, adding a lively feel to your slide.
Adding and Animating Summer Illustrations
Now that you have a looping video background and animated title text, it’s time to bring your summer illustrations to life with motion path animations. This section will guide you step-by-step on how to animate multiple objects with smooth looping motions and staggered delays for visual variety.
Step 1: Insert and Position Illustrations
Copy and paste your chosen illustrations onto the slide, positioning them at the bottom corners or other desired locations. For example, place a cocktail glass on the bottom left and an umbrella on the bottom right.
Step 2: Add Motion Path Animation
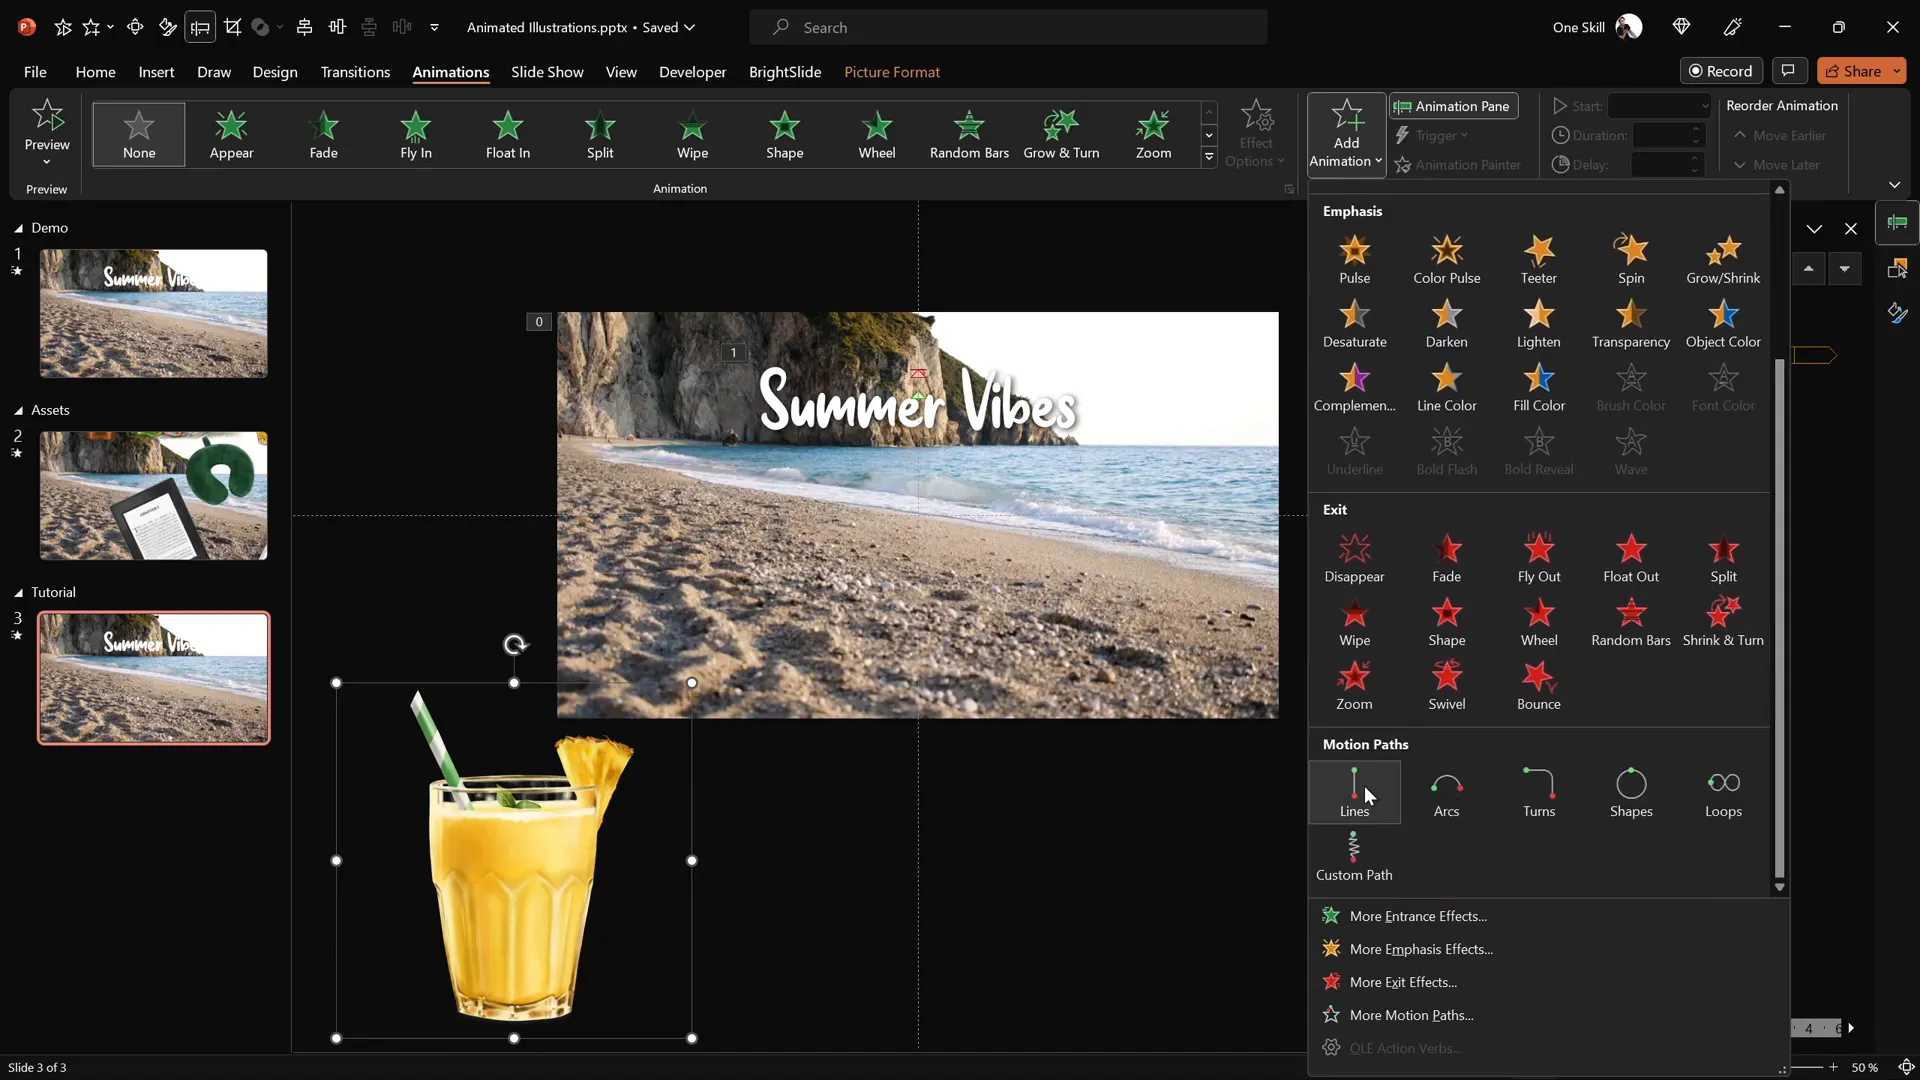
- Select the illustration (e.g., cocktail glass).
- Go to Animations and add a Motion Path: Line animation.
- Adjust the motion path’s ending point by dragging the red endpoint to a position near the center of the slide, just above the waterline or focal area.
- Reverse the motion path so the starting point aligns with the slide center and the illustration moves outward.
- Set the animation to start With Previous and duration to 4 seconds.
- Enable smooth start for a natural acceleration effect.
- Set the animation to repeat Until End of Slide for continuous looping.
Step 3: Add Entrance Zoom Animation
To prevent oversized illustrations and add a scaling effect:
- Add a Basic Zoom entrance animation to the illustration.
- Set it to start With Previous and match the 4-second duration of the motion path.
- Ensure it loops Until End of Slide.
Step 4: Duplicate Animations with Delay
- Use the Animation Painter tool to copy animations from one illustration to another (e.g., from the cocktail glass to the umbrella).
- Adjust the motion path starting point for each new illustration to maintain consistency.
- Add incremental delays (e.g., 1 second for the umbrella, 2 seconds for sunscreen bottle, 3 seconds for the hat) to stagger the animations and avoid simultaneous movements.
- Use the selection pane to layer illustrations appropriately (e.g., place the cocktail glass above the umbrella) for clean overlapping visuals.
By following these steps, you create a lively slideshow where summer-themed stickers gently move in a loop, adding charm and professionalism to your presentation.
Tips for Smooth Animation Playback
To ensure your animations run flawlessly and look polished, keep these essential tips in mind:
| Tip | Description | Benefit |
|---|---|---|
| Use Start With Previous for Video Playback | Triggers video to play automatically when the slide loads. | Creates seamless background motion without user intervention. |
| Loop Animations Until End of Slide | Sets animations to repeat continuously for the slide duration. | Keeps the motion ongoing, enhancing visual interest. |
| Apply Transparent Rectangle to Block Clicks | Draw a transparent shape over video to prevent accidental clicks resetting playback. | Maintains smooth video background without interruptions. |
| Stagger Animation Delays | Apply incremental start delays to animations on different objects. | Avoids cluttered, simultaneous movements and adds visual rhythm. |
| Use Animation Painter for Consistency | Copies animations from one object to others efficiently. | Saves time and ensures uniform animation styles. |
| Adjust Animation Paths and Positions | Customize motion paths to fit your slide layout and design. | Creates natural, appealing movements aligned with your content. |
With these tips, your animations will not only look impressive but also run smoothly during your presentation, enhancing audience engagement and showcasing your PowerPoint presentation skills.
Frequently Asked Questions
Can I use any video for the background?
Yes, you can use any video as a background, but make sure it is relevant to your presentation theme, has good quality, and is in a supported format (like MP4). Also, ensure it loops smoothly for continuous playback.
How do I ensure my animations don’t slow down my presentation?
Keep animations simple and avoid overloading slides with too many moving objects. Use compressed video files to reduce file size and test your presentation on the device you will present on to check performance.
Can I apply these animation techniques to other themes besides summer?
Absolutely! These animation principles—video backgrounds, motion paths, looping animations, and text effects—can be adapted for any theme, be it corporate, travel, education, or creative projects.
Where can I find fonts like Sweet Purple used in the tutorial?
You can download Sweet Purple and many other creative fonts from free font websites like DaFont. Choose fonts that align with your presentation style and audience.
Is this animation technique compatible with all versions of PowerPoint?
This tutorial uses Microsoft PowerPoint 365, which supports advanced animation features. Earlier versions may have limited capabilities. If you’re using an older version, check if motion path animations and video playback options are available.
How can I keep the video background from showing player controls during presentation?
In the slideshow tab, uncheck the “Show Media Controls” option to hide the video player controls, creating a cleaner look for your video background.
Conclusion: Take Your PowerPoint Presentation Skills to the Next Level
Mastering looping sticker animations combined with video backgrounds and animated text is a powerful way to captivate your audience and elevate your PowerPoint presentation skills. By following the step-by-step process outlined here, you can create engaging, professional-looking slides that stand out.
The key takeaways include:
- Using high-quality PNG illustrations with transparent backgrounds for easy layering.
- Incorporating video backgrounds that start automatically and loop seamlessly.
- Applying multi-step text animations like zoom and wave effects for dynamic titles.
- Animating multiple objects with motion paths, staggered delays, and looping for continuous movement.
- Utilizing PowerPoint tools like animation painter and transparent shapes to enhance workflow and user experience.
With these techniques, your presentations will not only look visually stunning but also demonstrate your advanced command of PowerPoint’s animation capabilities. Whether you’re a student, educator, marketer, or professional, these skills will help you communicate your message more effectively and keep your audience engaged.
Remember, great PowerPoint presentation skills are about combining creativity with technical know-how. Experiment with different animations, timings, and assets to find the style that best fits your content and personality. And don’t forget to practice running your slideshow to ensure everything flows smoothly on the big day.
Stay inspired, keep honing your skills, and watch your presentations transform from ordinary to extraordinary!
Check out the full video: PowerPoint Presentation Skills: Looping Sticker Animation! ✨


