

Creating compelling and professional PowerPoint presentations is an essential skill that can set you apart in meetings, lectures, and pitches. Whether you’re a beginner or a seasoned user, mastering PowerPoint shortcuts and design techniques can dramatically improve your workflow and the quality of your slides.
In this comprehensive guide, we explore 20 advanced PowerPoint tips and tricks designed to take your presentations to the next level. From creative visual effects like glassmorphism and duotone to powerful animation tools and slide master secrets, you’ll learn how to enhance your slides with precision and style. Plus, discover essential PowerPoint shortcuts that will save you time and boost your productivity.
Table of Contents
- 1. Glassmorphic Effect: Add Frosty, Blurred Shapes
- 2. Insert Photos and Videos into Any Custom Shape
- 3. Use Slide Grids for Perfect Alignment
- 4. Create Stunning Duotone Effects
- 5. Master Text and Line Spacing
- 6. Convert Text to Vector Shapes for Creative Designs
- 7. Use Colorful Shadows for Visual Impact
- 8. Leverage Slide Master for Global Changes
- 9. Apply Gradient Fill to Text
- 10. Design Modern Gradient Charts
- 11. Animate Objects via Slide Master
- 12. Extend Animation Duration Beyond Limits
- 13. Set Precise Rotation Centers for Animations
- 14. Combine GIFs with PowerPoint Animations
- 15. Loop Multiple Animations Using Bookmark Triggers
- 16. Perfect the Morph Transition with Naming
- 17. Animate Photos using Morph and Crop
- 18. Create Auto-Updating Donut Charts
- 19. Divide Pie or Donut Charts into Equal Parts
- 20. Essential PowerPoint Shortcuts for Efficiency
1. Glassmorphic Effect: Add Frosty, Blurred Shapes
The glassmorphic effect is a trendy design style that mimics frosted glass by blending transparency with blur. It adds a sleek, modern touch to your slides and helps highlight text or shapes without blocking the background.
Here’s how to create a glassmorphic effect for any shape on your slide:
- Start with a background image or color on your slide.
- Insert the shape you want to apply the effect to, such as a rounded rectangle with no fill and a thin outline.
- Select the background image, go to Format Picture > Artistic Effects, and apply the Blur effect with the maximum radius (100).
- Right-click the blurred image and copy it.
- Reset the original image to remove the blur.
- Change the slide background fill to Picture, and paste the copied blurred image using the clipboard button.
- Position the blurred image so it aligns with the shape.
- Select the shape and choose Slide Background Fill. The shape will now display the blurred background, creating the glassmorphic effect.
- For added realism, apply a white inside shadow to your shape for a frosty glow.
This method lets you add a stylish, blurry overlay anywhere on your slide without needing external software.

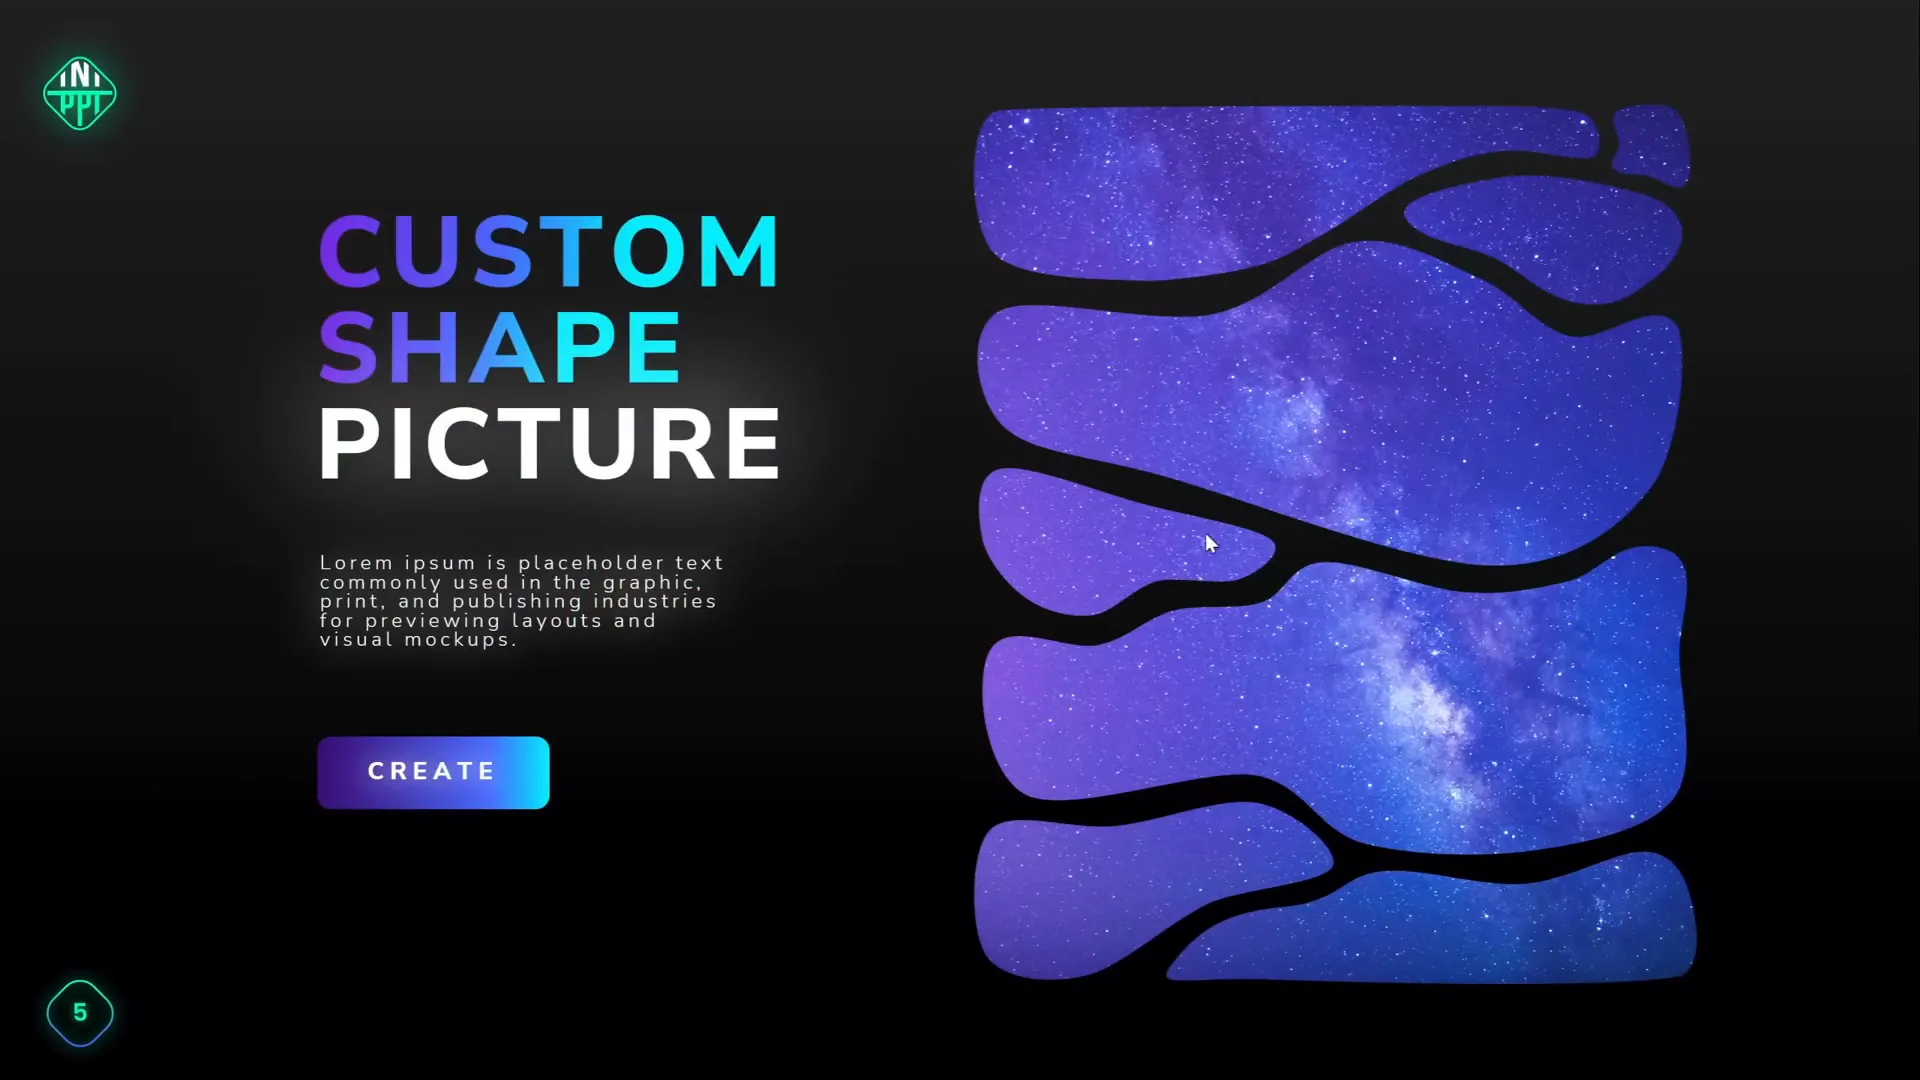
2. Insert Photos and Videos into Any Custom Shape
PowerPoint allows you to insert pictures and videos into standard shapes like circles or squares, but did you know you can do this with custom shapes too?
Follow these steps to place media inside any vector shape:
- Create a custom shape with the Curve Tool or other shape tools. For example, draw a blob-like shape by clicking points and closing the path.
- Make circles or semicircles by merging shapes: draw circles, use rectangles, and apply Merge Shapes > Subtract to cut shapes.
- Union multiple shapes into one by selecting them and using Merge Shapes > Union.
- Insert the photo or video and resize it to cover the custom shape fully.
- Send the photo or video to back.
- Select both the media and the shape, and use Merge Shapes > Intersect. This clips the media into the custom shape.
You can fine-tune the media inside the shape using the crop and adjustment tools.
For templates, create a custom picture placeholder in the Slide Master:
- In Slide Master view, combine your custom shapes into one.
- Insert a picture placeholder and position it over the shapes.
- Send the placeholder to back, select both placeholder and shape, and intersect them.
- Exit Slide Master and apply the new layout.
- Click the image icon to insert photos easily within the custom shape.
This approach streamlines inserting images and videos in complex shapes, perfect for stylish presentations.
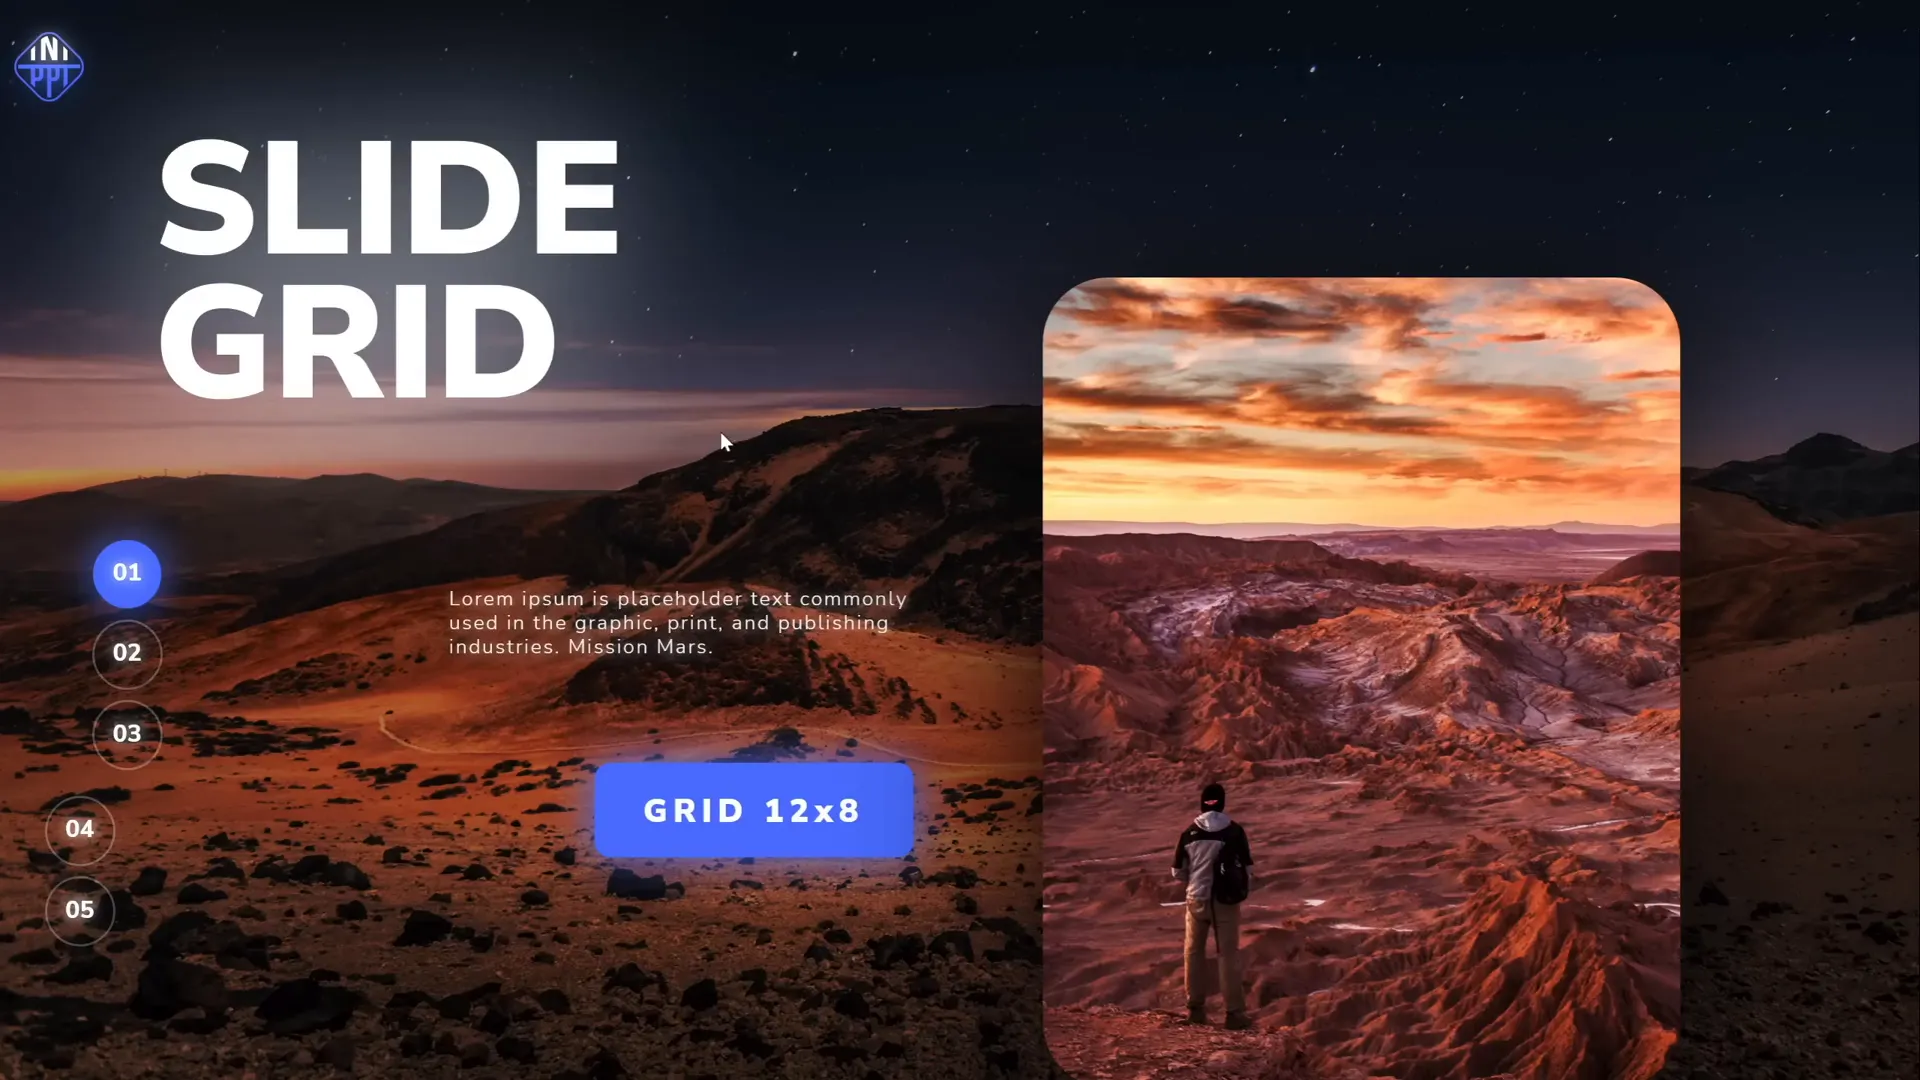
3. Use Slide Grids for Perfect Alignment
Alignment is a subtle yet powerful factor that makes slides look polished and professional. Using slide grids helps you position elements evenly and create balance.
Observe two slides with the same content but different alignment:
- One slide’s elements are scattered and misaligned.
- The other slide uses a grid, with all objects aligned properly, creating a neat, harmonious look.
You can create custom slide grids by:
- Decide on the grid size, e.g., 12 columns by 8 rows.
- Insert rectangles for columns spanning the full height, arrange them side by side.
- Select all columns and group them.
- Repeat for rows using rectangles spanning the width.
- Select both groups and group again into a single grid object.
- Adjust transparency and remove fill for unobtrusive grid lines.
- Toggle visibility using the Selection Pane’s eye icon to show/hide the grid as needed.
Use this grid as a guide to align logos, text, images, and buttons consistently. It’s a simple way to upgrade the professionalism of your slides.
4. Create Stunning Duotone Effects
Duotone is a popular effect where an image is recolored using two contrasting colors, creating a visually striking appearance. PowerPoint does not natively support duotone effects, but you can achieve this easily with free online tools.
Steps to create a duotone image:
- Visit duotone.shapefactory.co.
- Choose two colors: one bright and one dark to ensure good contrast.
- Upload or select a stock photo from the site.
- Download the duotone image and insert it into your PowerPoint slide.
This allows you to match your brand colors or create mood-specific visuals.
Bonus tip: Use the free Chrome extension Scribe to create step-by-step guides quickly. It records your screen actions and generates easy-to-share instructions, perfect for sharing techniques like the duotone effect with your team or friends.
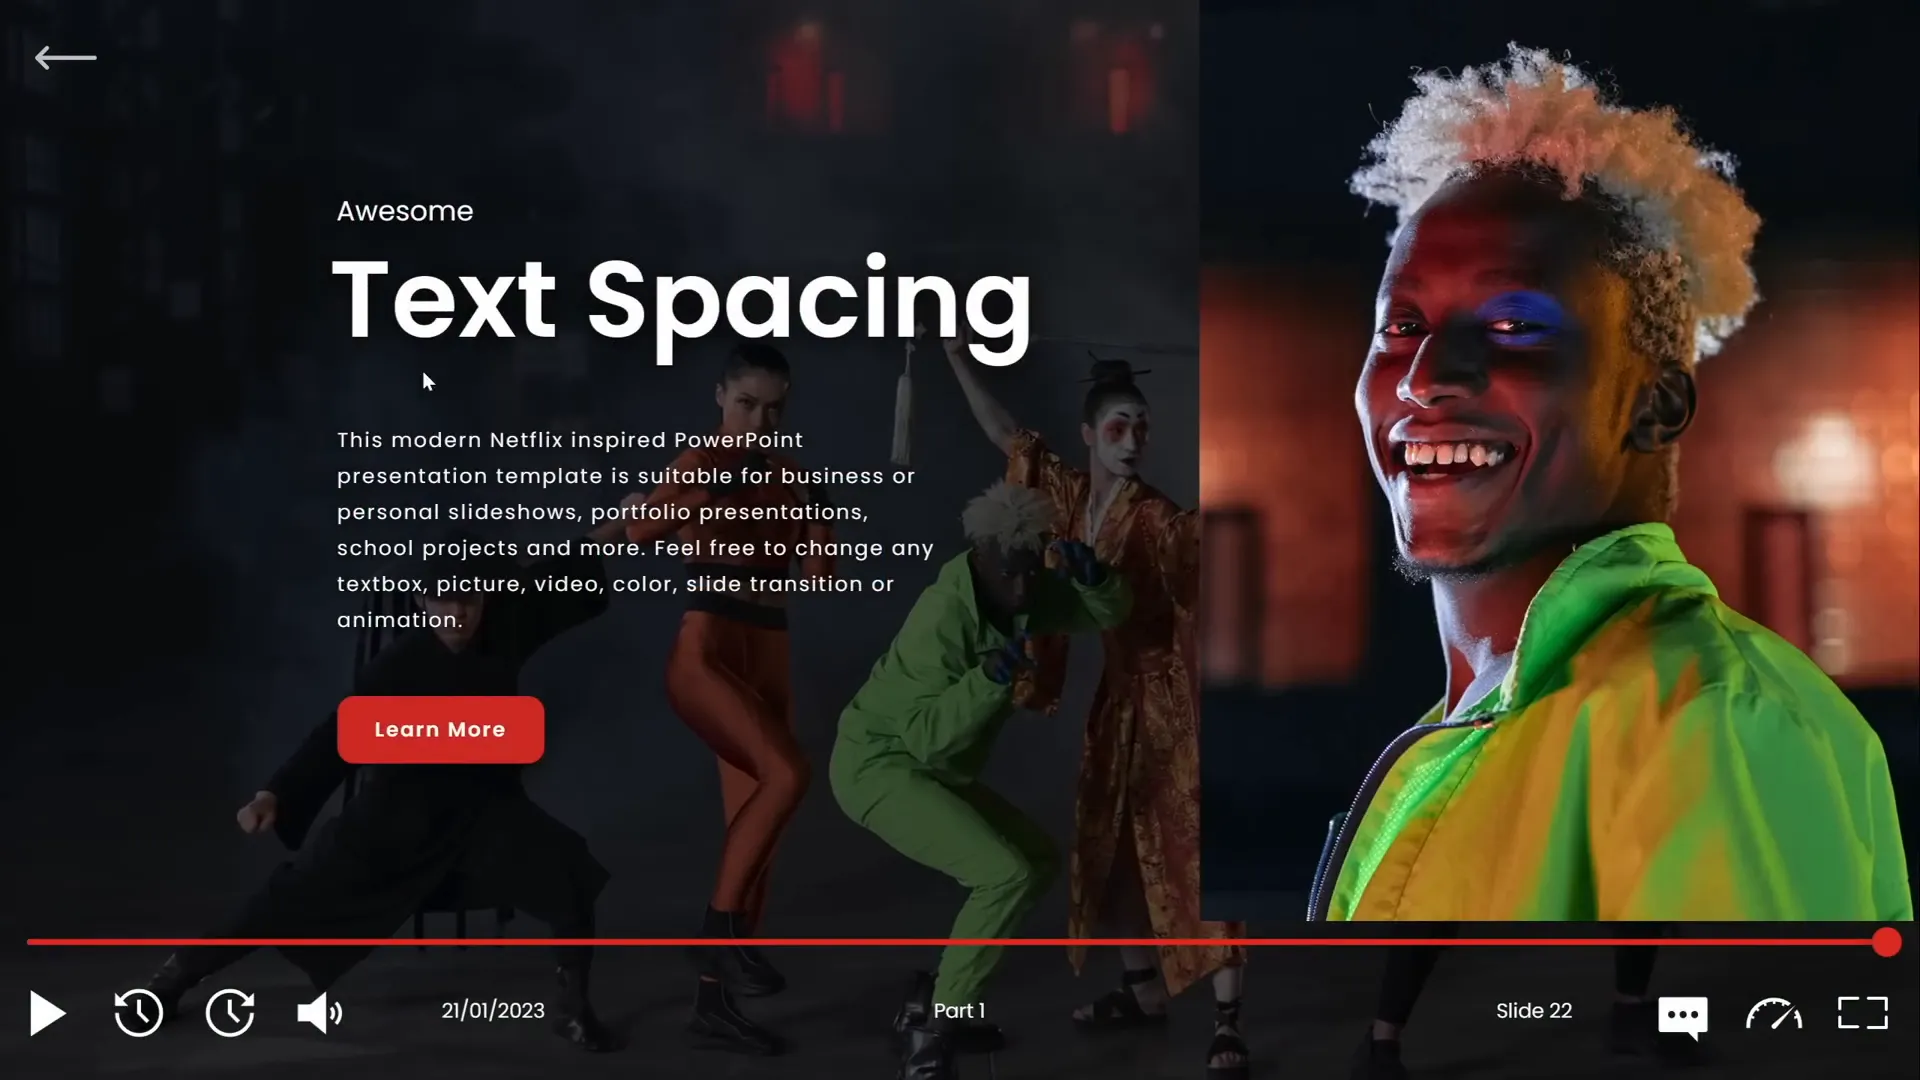
5. Master Text and Line Spacing
Proper text and line spacing can dramatically improve readability and aesthetic appeal of your slides.
Adjusting Letter Spacing
- Use the text spacing dropdown to choose presets like Very Loose.
- If presets aren’t enough, select More Spacing Options and expand spacing by a custom point value, e.g., 15pt for dramatic effect.
- For subtle spacing, try 1pt expansion to give letters breathing room without breaking the flow.
Adjusting Line Spacing
- Access paragraph settings to choose line spacing options.
- One and a half line spacing might be too wide; try Multiple with a value less than 1, like 0.8, for tighter control.
- This prevents overlapping and keeps text blocks neat.
Mastering these settings helps you avoid cramped or overly spaced text, making your content more inviting and professional.
6. Convert Text to Vector Shapes for Creative Designs
Converting text into vector shapes unlocks creative possibilities like cutting text with shapes, applying unique effects, and customizing typography beyond standard formatting.
How to convert text to vectors:
- Create your text box with the desired font (e.g., the beautiful Orbit font).
- Create a shape for cutting or manipulation.
- Select the text box, hold Shift and select the shape.
- Use Merge Shapes options like Subtract to cut the text or Union to convert the entire text into vector.
Example creative use:
- Cut text into parts by using shapes and the intersect function.
- Duplicate slides to show different parts of the text separately.
- Arrange parts with a gap for artistic effects.
This technique is perfect for creating custom typography for headers, logos, or artistic slide elements.
7. Use Colorful Shadows for Visual Impact
By default, PowerPoint applies black shadows, but customizing shadow colors can add a fresh and vibrant look to your slides.
To apply colorful shadows:
- Select the shape or element you want to highlight.
- Go to Shadow Options and pick an outer shadow preset.
- Change the shadow color to a bright or pastel tone that complements your design.
- Add blur (e.g., 75 points) for softness.
- Adjust distance and transparency to control shadow intensity and spread.
Colorful shadows can draw attention to charts, icons, or text, making your slides more engaging without overwhelming the design.

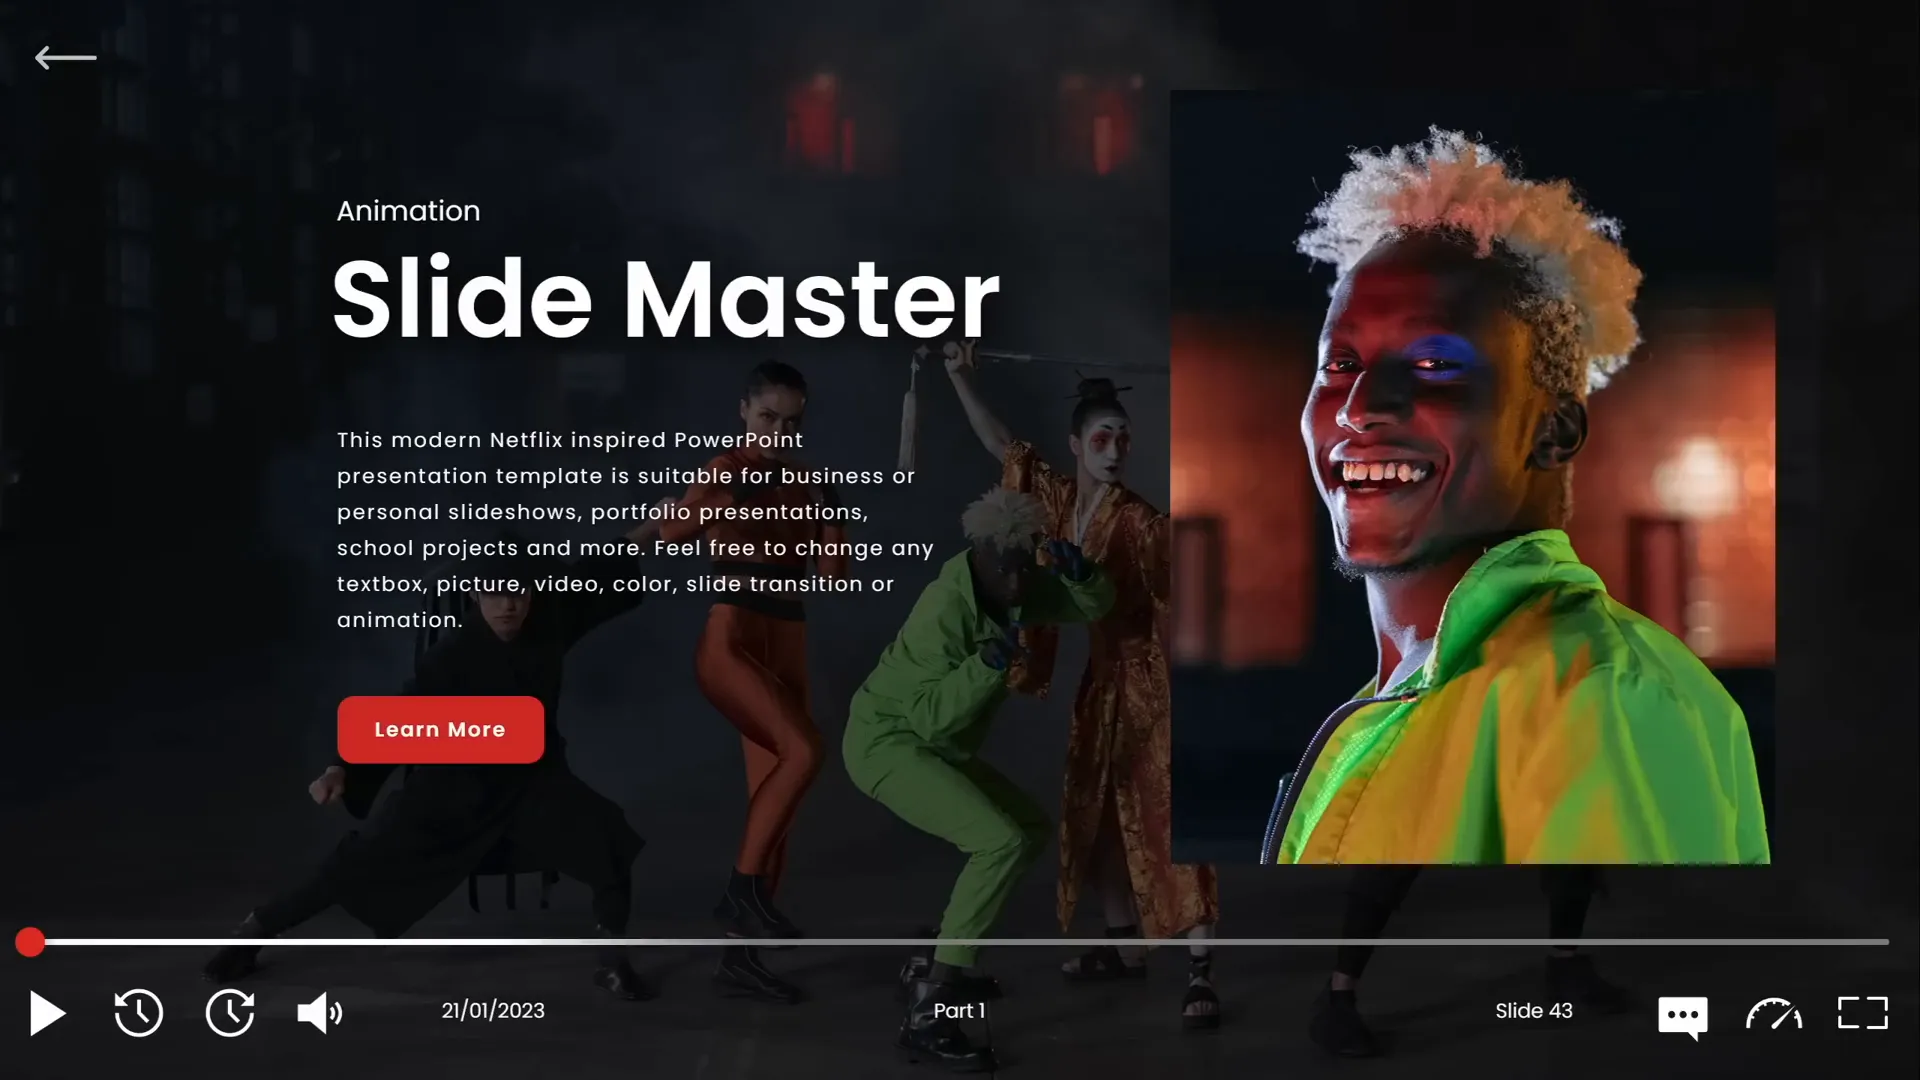
8. Leverage Slide Master for Global Changes
The Slide Master is a powerful feature that lets you make changes that apply across your entire presentation, saving time and ensuring consistency.
Key uses of Slide Master include:
- Adding logos or watermarks that appear on all slides.
- Customizing slide numbers’ appearance and position globally.
- Changing background styles or fonts for all slides simultaneously.
To use Slide Master:
- Go to View > Slide Master.
- Make your edits, such as inserting a centered logo or changing the slide number shape from a rounded square to a circle.
- Adjust the position of elements like the slide number to your preference.
- Close Slide Master to see changes reflected on all slides.
Shortcut: Hold Shift and click the Slide Master icon to access it quickly.

9. Apply Gradient Fill to Text
Gradient text adds depth and flair to your slide titles and headers, helping important words stand out.
How to add gradient text:
- Select your text box.
- Open Text Fill > Gradient Fill options.
- Add multiple color stops and adjust their positions to create smooth color transitions.
- For emphasis, fill specific words with white and add a white shadow glow.
- Experiment with transparency stops to create fade effects.
This effect is especially impactful on dark backgrounds or minimalistic slides.

10. Design Modern Gradient Charts
Charts with gradient fills look sleek and modern, enhancing data visualization on your slides.
Steps to create gradient charts:
- Insert an Area Chart and resize it.
- Clean up unnecessary elements like chart title, axis labels, and gridlines.
- Edit chart data by deleting extra columns and inputting your data.
- Use the formula
=RANDBETWEEN(1,100)to generate random data points for sample charts. - Apply gradient fill to the chart area with one color fully opaque and the other fully transparent.
- Add a gradient line for the chart outline with similar opacity settings.
These charts are visually appealing and can be customized with your brand colors.

11. Animate Objects via Slide Master
Did you know you can add animations in the Slide Master that apply to all slides using that layout? This feature allows for consistent, repeated animations across multiple slides without duplicating effort.
Example use cases:

- Animating logos or background elements for subtle branding.
- Adding playback animations or decorative motion that repeats on every slide.
To add Slide Master animations:
- Open View > Slide Master.
- Select the layout and insert or select the object you want to animate.
- Add animations as usual.
- Close Slide Master and see the animations play on all slides using that layout.
For example, you can create a moving icon, like a fox, that animates on every slide of a given layout by applying a motion path animation and setting it to auto-reverse and repeat until the slide ends.
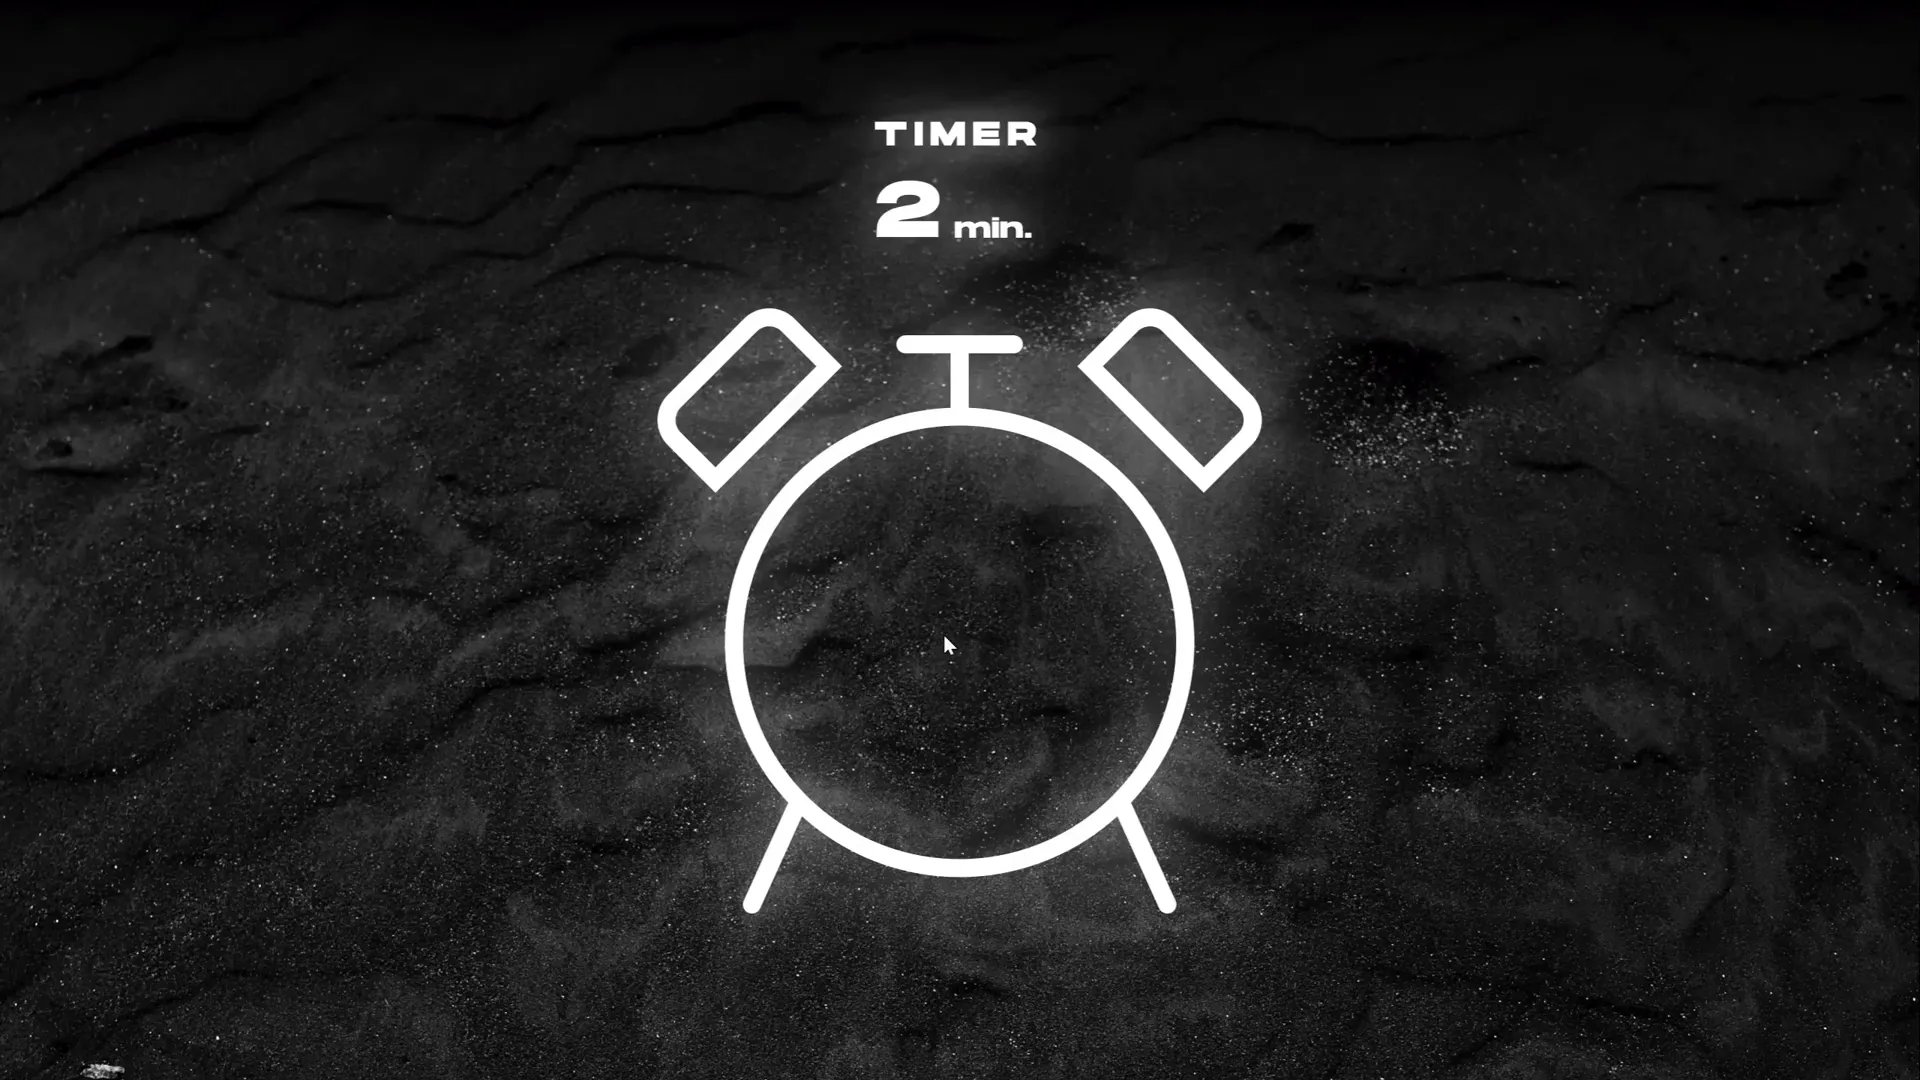
12. Extend Animation Duration Beyond Limits
PowerPoint limits animation duration inputs to 59 seconds in the basic UI, but you can extend animations to longer durations via the animation settings dialog.
How to set long animations:
- Select the animated object.
- Choose the animation (e.g., Wheel).
- Double-click the animation in the Animation Pane to open settings.
- In the Timing tab, type the desired duration in seconds (e.g., 120 for two minutes).
- Click OK; the duration will appear as “Auto” but will reflect your input.
- Play the animation to verify the extended duration.
This technique is great for timers, loaders, or slow-progress animations that require long durations.
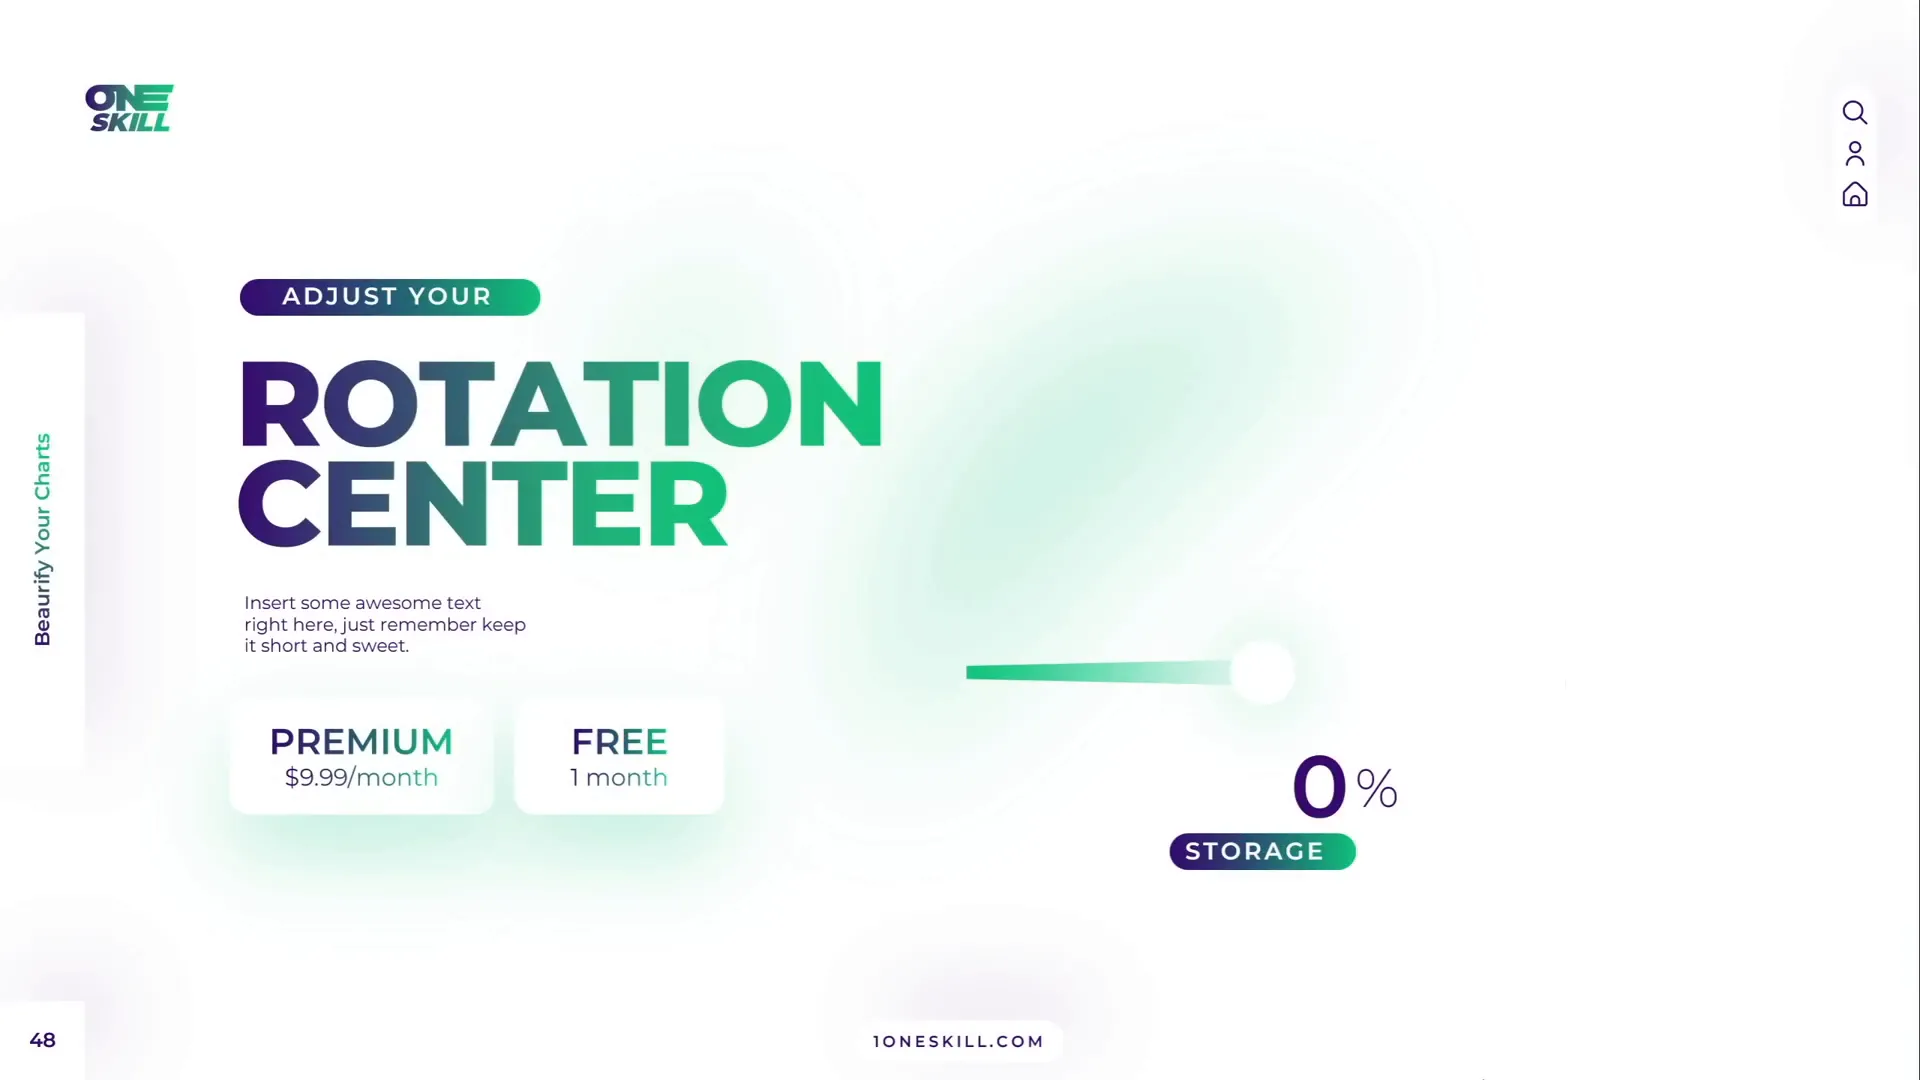
13. Set Precise Rotation Centers for Animations
Animations often rotate around the center of the object by default, but sometimes you need custom rotation centers (e.g., rotating an arm around a shoulder).
To create custom rotation centers:
- Group your object with a large invisible shape (such as a big circle) aligned so that the desired rotation point lies at the center of the group.
- Remove the fill of the large shape to keep it invisible.
- Rotate the group; the rotation will now pivot around the desired point.
This technique provides precise control over animated rotations, essential for complex character or mechanical animations.
14. Combine GIFs with PowerPoint Animations
Complex animations like waving characters or robotic movements can be hard to replicate using only PowerPoint animations. Combining GIFs with animations offers a powerful workaround.
Workflow:
- Find or create a GIF with desired animation (e.g., a waving robot).
- Insert the GIF into your slide.
- Add additional PowerPoint animations like motion paths to the GIF for movement.
- Use animation painter to replicate animations on other elements if needed.
- Export slides as GIFs for smooth playback or use in other contexts.
Tip: Export a single slide as an animated GIF by going to File > Export > Create an Animated GIF and selecting options for quality and slide range.

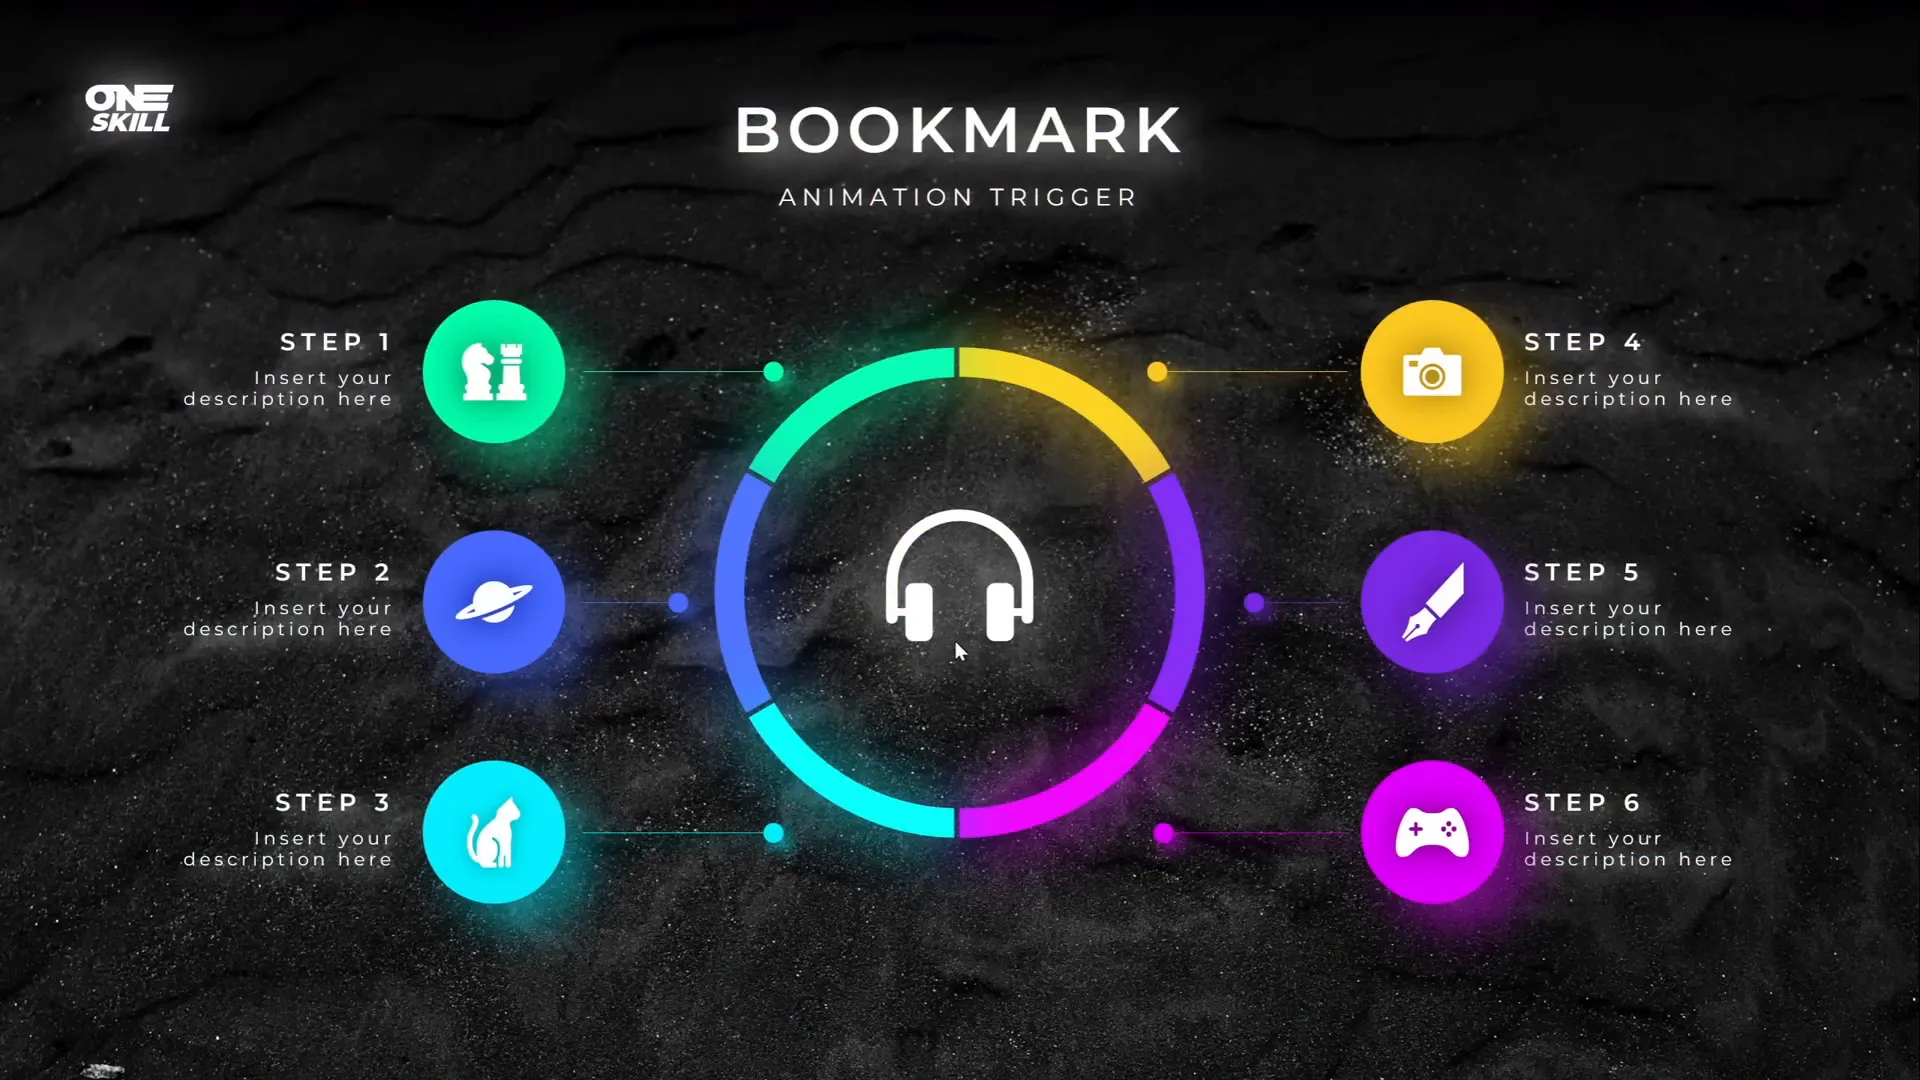
15. Loop Multiple Animations Using Bookmark Triggers
Bookmark triggers are an advanced animation tool that lets you loop sequences of animations precisely, even with delays.
How to use bookmark triggers:
- Apply animations to objects (e.g., grow and shrink effects on bubbles).
- Insert a silent audio clip slightly longer than the total animation duration.
- In the Animation Pane, move the audio to the top and set it to play automatically and loop until stopped.
- Trim the audio to the exact length needed.
- Add a bookmark to the audio timeline at the end of the clip.
- Select animations to loop, go to Animations > Trigger > On Bookmark, and select the bookmark you created.
- Animations will now loop in the correct sequence until you advance the slide.
This method overcomes limitations of standard animation looping and helps create dynamic, continuous visual effects.
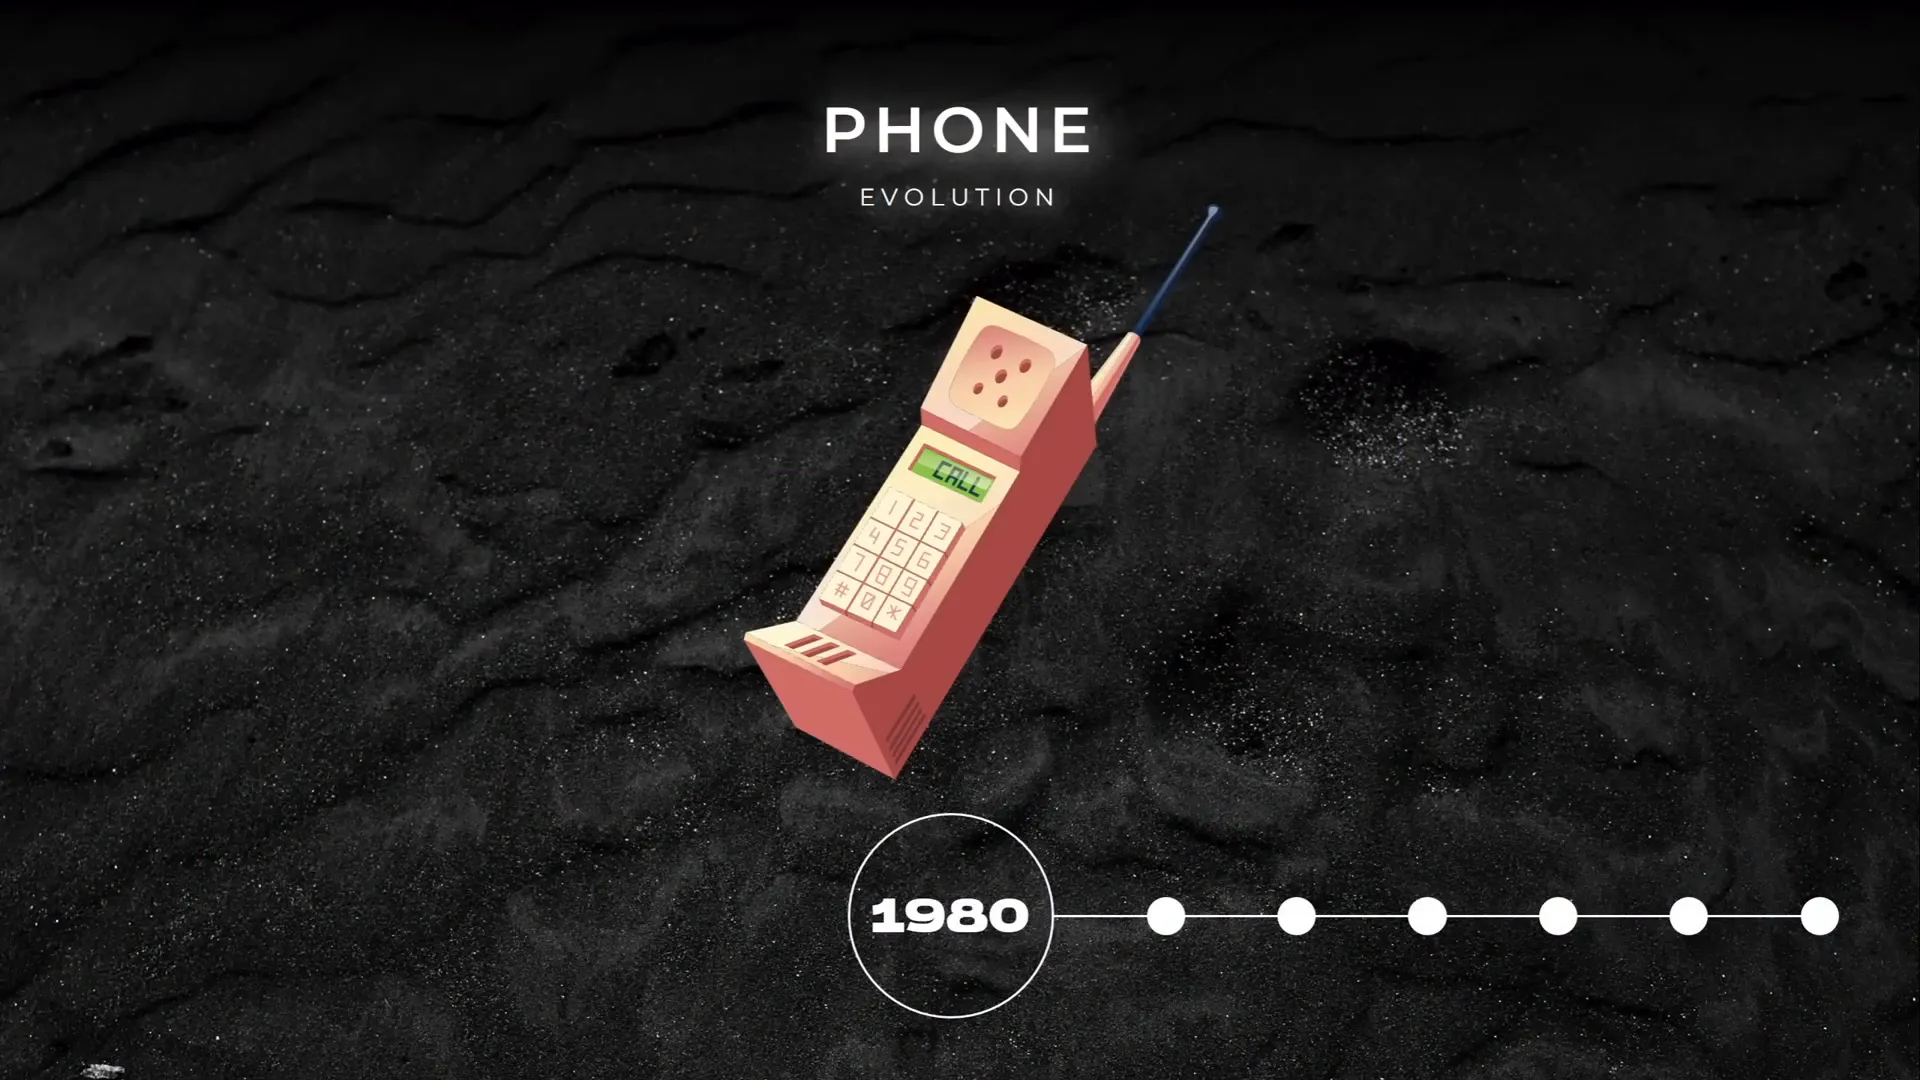
16. Perfect the Morph Transition with Naming
The Morph transition creates smooth animations between slides by matching objects with the same name. To ensure perfect morphs:
- Open the Selection Pane (Arrange > Selection Pane).
- Rename matching objects on both slides with the same unique name, starting with double exclamation marks (e.g.,
!!phone). - Apply the Morph transition to the slide.
- Preview the transition to see seamless morphing.
Without matching names, PowerPoint may just fade objects instead of morphing them smoothly.
17. Animate Photos using Morph and Crop
You can create dynamic photo animations by combining Morph transition with photo cropping adjustments.
How to do it:
- Insert and crop a photo into a shape (e.g., circle).
- Duplicate the slide.
- On the duplicate, move the photo to a new position and adjust the crop size to zoom in or out.
- Apply the Morph transition between the slides.
- Play the slideshow to see the photo move and zoom smoothly.
This technique adds professional polish and cinematic effects to presentations.
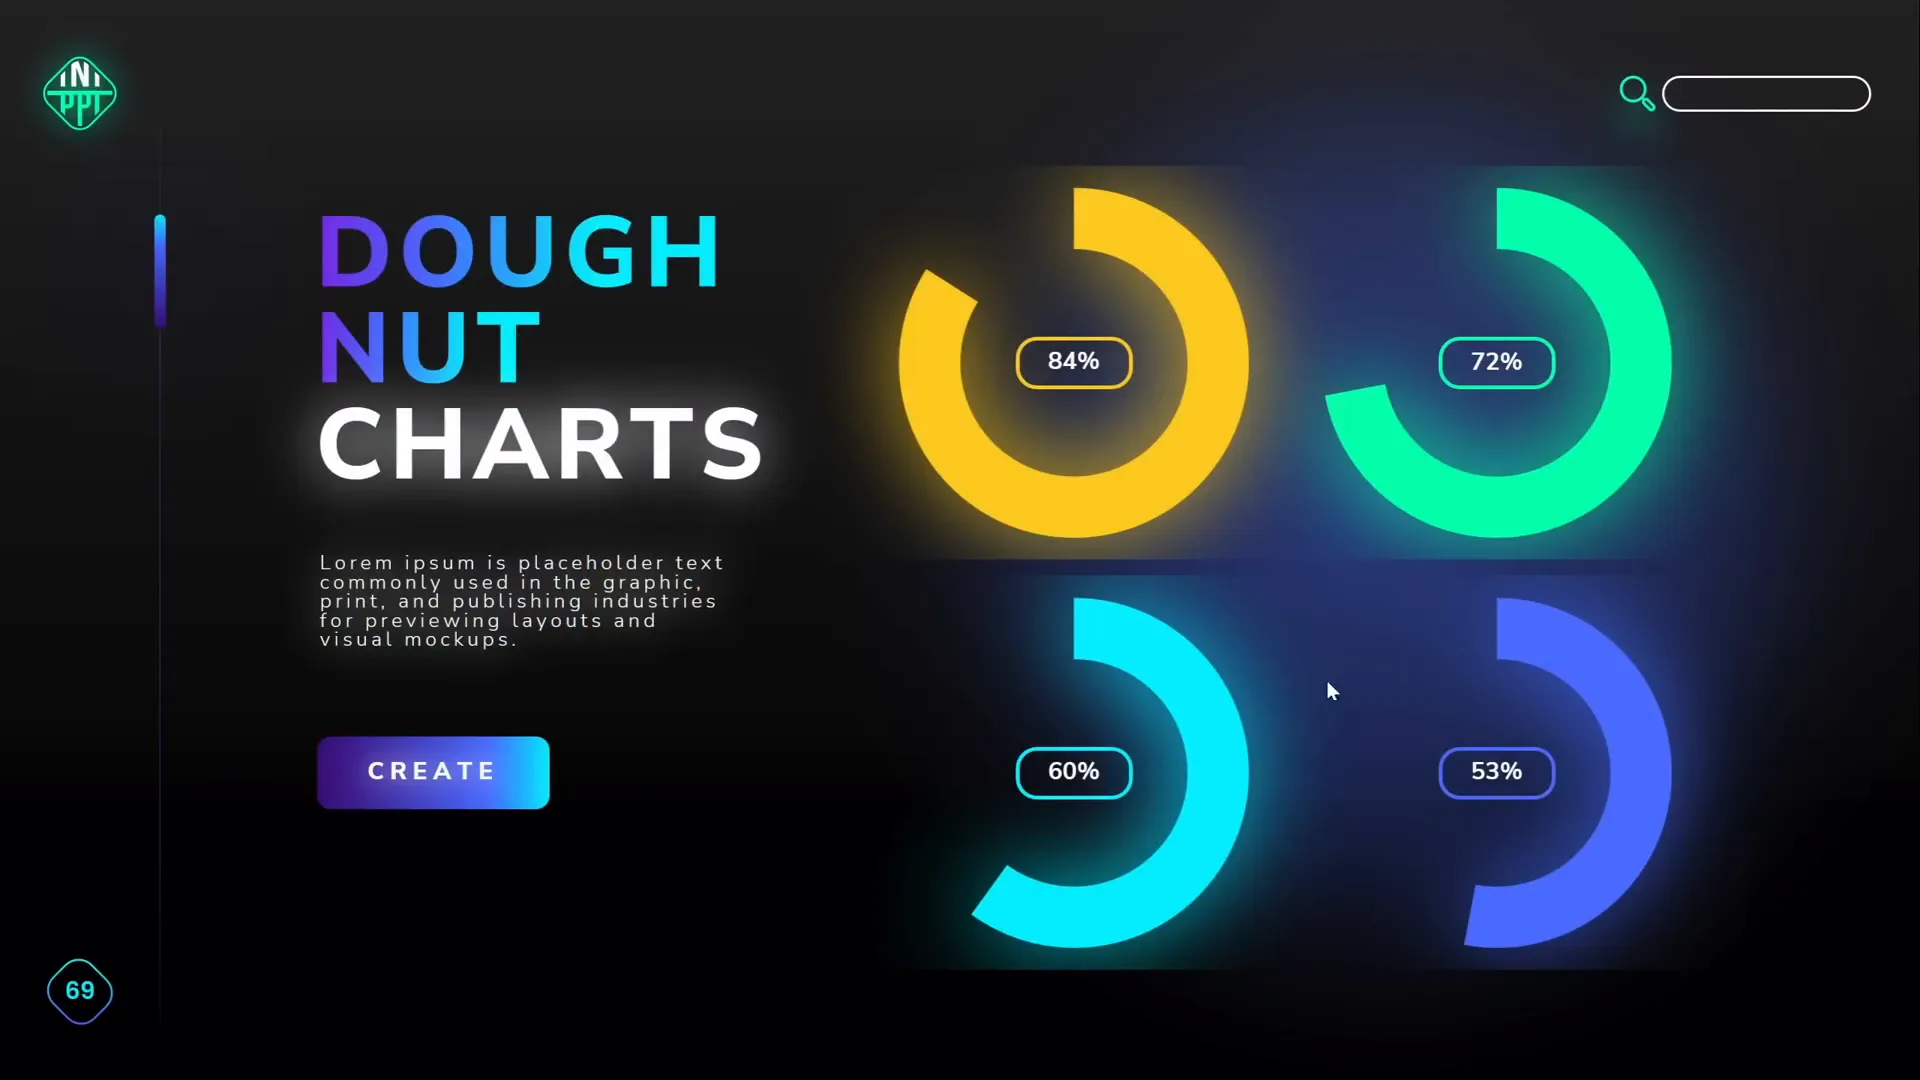
18. Create Auto-Updating Donut Charts
Auto-updating donut charts simplify data visualization by linking chart parts with formulas.
Steps to create:
- Insert a donut chart.
- Keep only two rows: “Visible part” and “Invisible part.”
- For the invisible part, use the formula:
=100 - [Visible Part]. - Changing the visible part automatically adjusts the invisible part.
- Style the chart with shadows or colors to make it pop.
This method is perfect for progress indicators and percentage displays.
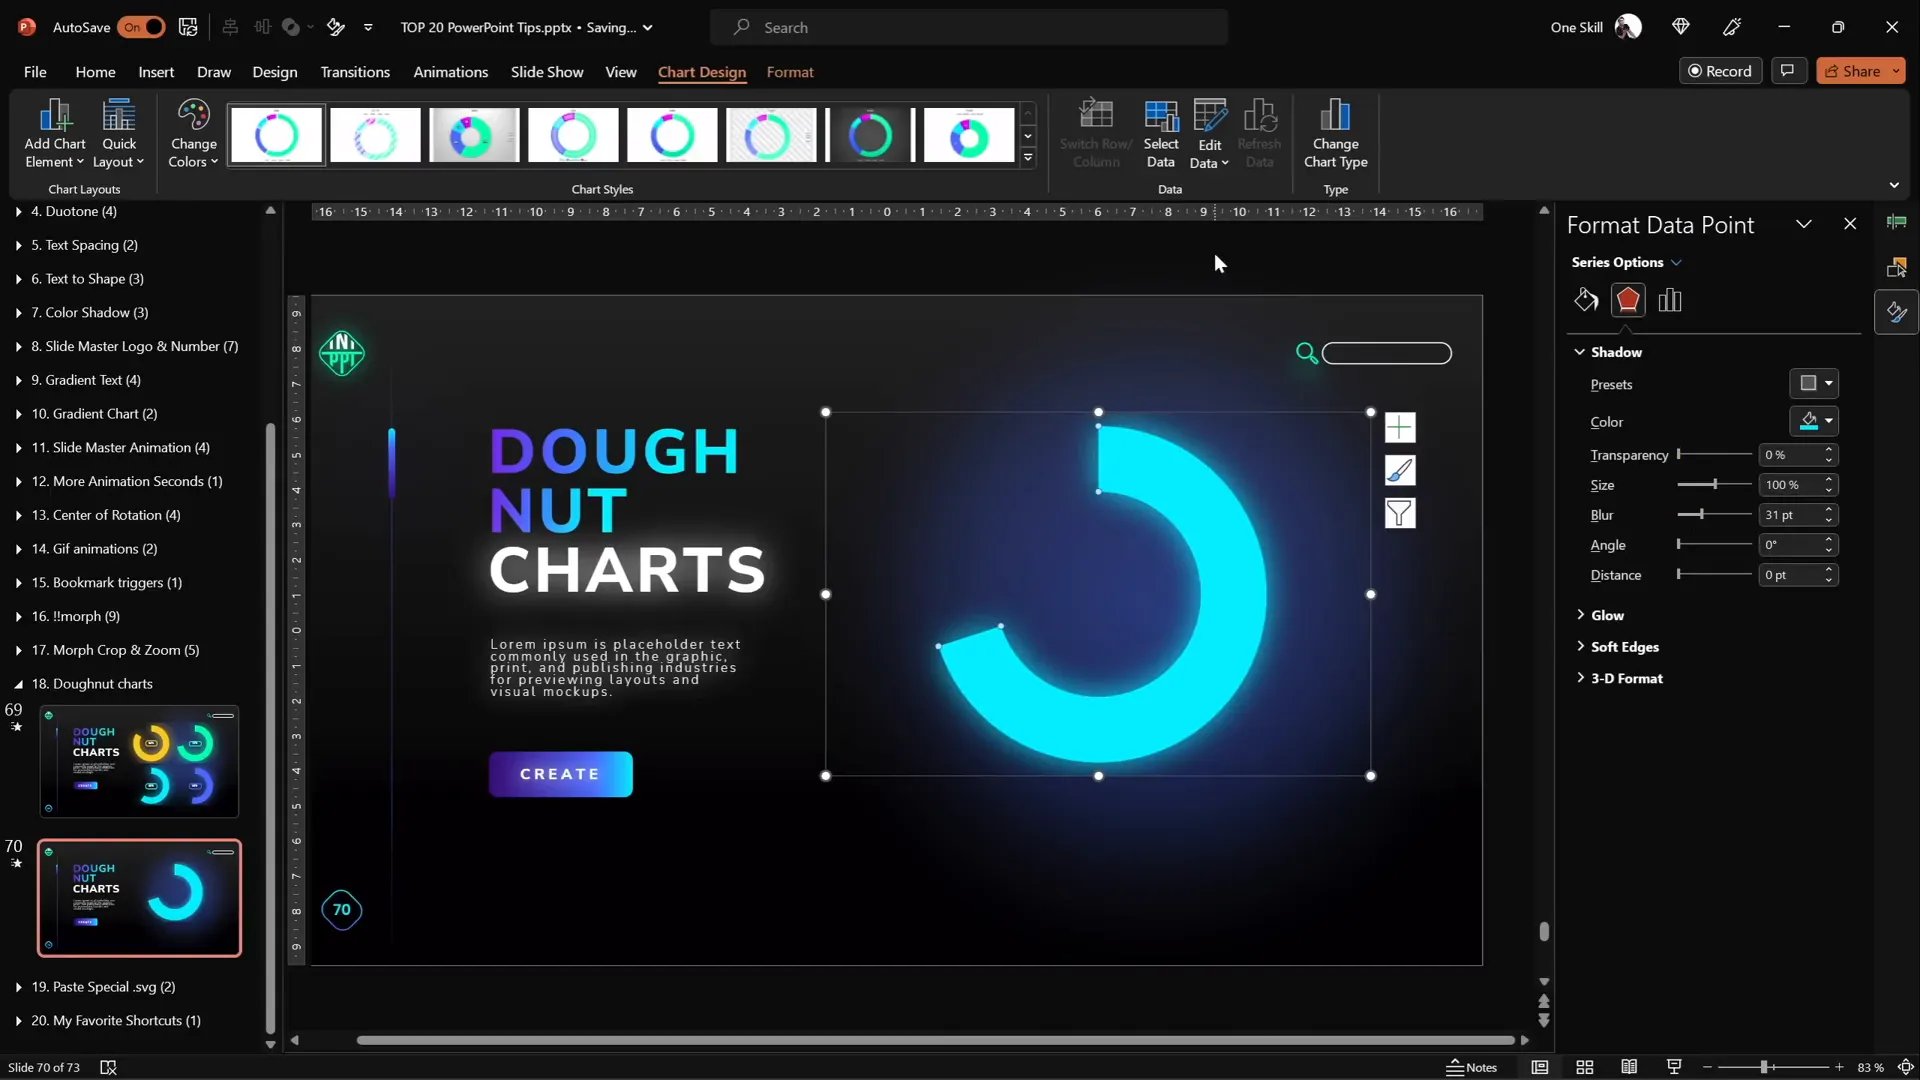
19. Divide Pie or Donut Charts into Equal Parts
Dividing charts into equal segments is useful for UI elements and infographics.
How to divide a donut chart:
- Insert a donut chart.
- Set the number of rows equal to the number of desired segments (e.g., six).
- Fill each row with the same value (e.g., 10) to create equal slices.
- Remove unnecessary chart elements like titles and legends.
- Adjust hole size to your preference.
- To edit individual parts, convert the chart to SVG by using Paste Special > SVG.
- Convert SVG to shapes and ungroup to access individual slices.
- To add spacing between slices, create narrow rectangles and subtract them from the donut shape using Merge Shapes > Subtract.
- Fragment the shape with a background shape to separate slices further.
Now you can customize each segment individually for advanced designs.
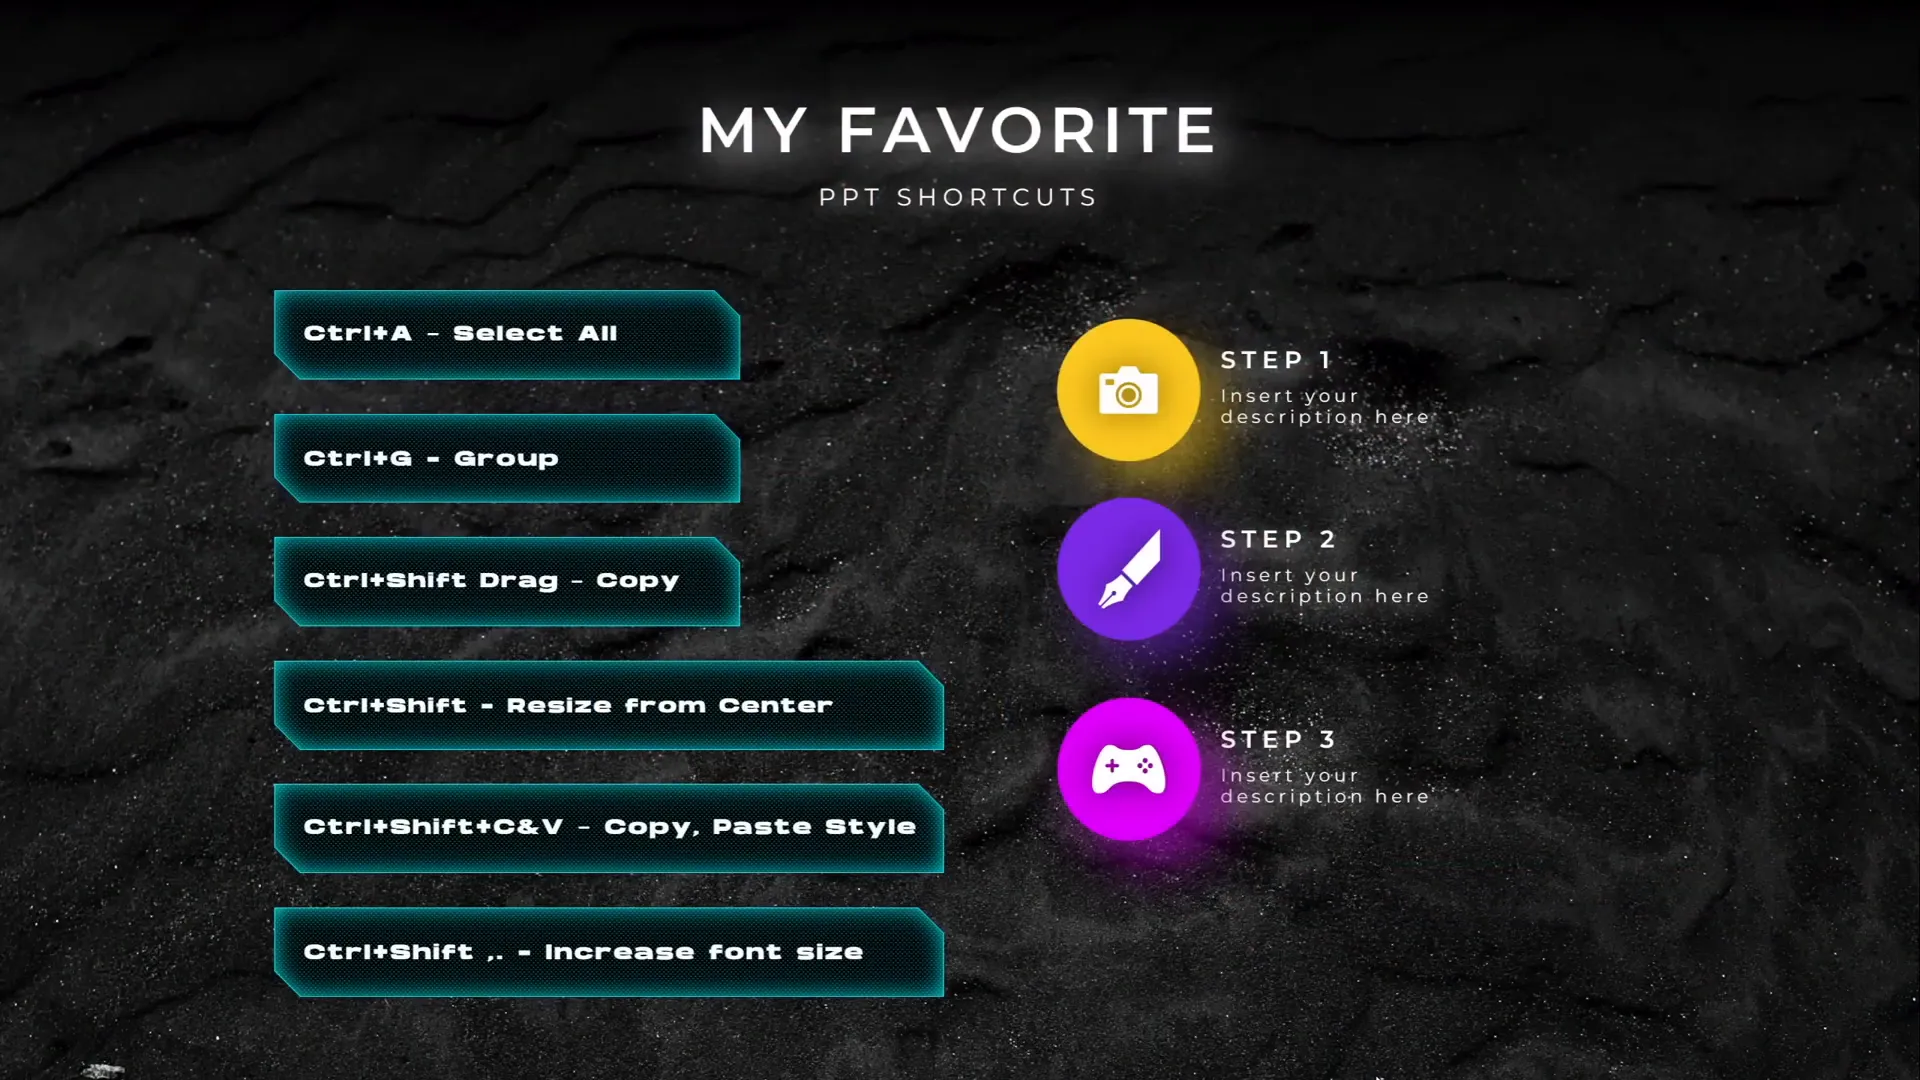
20. Essential PowerPoint Shortcuts for Efficiency
Mastering PowerPoint shortcuts is key to speeding up your workflow and reducing repetitive tasks. Here are some favorites used by professionals:
| Shortcut | Function | Description |
|---|---|---|
| Ctrl + A | Select All | Selects all objects on the current slide. Hold Shift to deselect specific items. |
| Ctrl + G | Group | Groups selected objects for easier movement and formatting. |
| Drag + Ctrl | Duplicate | Drag an object while holding Ctrl to create a copy. |
| Drag + Ctrl + Shift | Duplicate in Straight Line | Duplicate while constraining movement horizontally or vertically. |
| Resize + Shift | Maintain Proportions | Resize shapes proportionally from the corner. |
| Resize + Ctrl + Shift | Resize from Center | Resize shapes proportionally from the center. |
| Ctrl + Shift + C | Copy Formatting | Copies the formatting of the selected object. |
| Ctrl + Shift + V | Paste Formatting | Applies copied formatting to another object. |
| Ctrl + Shift + . | Increase Font Size | Increases the font size of selected text. |
Incorporate these shortcuts into your routine to work smarter, not harder.
Frequently Asked Questions (FAQ)
Q1: How can I create the glassmorphic effect without external software?
You can create the glassmorphic effect directly in PowerPoint by blurring your background image with Artistic Effects, copying the blurred image, and using it as the fill for a shape with Slide Background fill. Adding a white inside shadow enhances the frosted glass look.
Q2: Can I insert a video into a custom shape?
Yes! Insert your video, resize it to cover the custom shape, send it to back, then select the video and shape and use Merge Shapes > Intersect to clip the video inside the shape.
Q3: What is the benefit of using Slide Master animations?
Animations added in Slide Master apply to all slides using that layout, allowing you to create consistent, repeatable animations without duplicating work on each slide.
Q4: How do I loop animations in a specific sequence?
Use an audio bookmark trigger with a silent audio clip. Set the audio clip to loop, add a bookmark, and trigger your animations on that bookmark for precise, looping sequences.
Q5: How do I ensure Morph transitions work smoothly?
Rename the objects you want to morph with the exact same name starting with double exclamation marks (e.g., !!objectname) in the Selection Pane on both slides to link them.
Q6: What are the most useful PowerPoint shortcuts to learn?
Essential shortcuts include Ctrl + A (select all), Ctrl + G (group), Ctrl + Shift + C/V (copy/paste formatting), and Ctrl + Shift + . (increase font size). These save time and improve efficiency.
Conclusion
Mastering these top 20 PowerPoint tips and tricks will elevate your presentation design and workflow. From stunning visual effects like glassmorphism and duotone, to advanced animation techniques using Slide Master and bookmark triggers, you now have a comprehensive toolkit to create polished, engaging slides.
Don’t forget to incorporate the essential PowerPoint shortcuts into your daily routine—they will save you time and effort, making your design process smoother and more enjoyable. Whether you’re crafting business pitches, educational lectures, or creative portfolios, these tips will help you stand out and communicate your message effectively.
Keep experimenting, stay creative, and enjoy building beautiful presentations that captivate your audience!
Check out the full video: TOP 20 PowerPoint TIPS & TRICKS!😁✨


