

Creating professional and visually appealing PowerPoint slide designs can sometimes feel overwhelming, especially when you’re pressed for time. But what if you could design five beautiful slides in just ten minutes? Inspired by a creative challenge from fellow presentation experts, this guide will walk you through a practical and efficient process to do exactly that. From customizing your workspace for speed to designing diverse slide types with engaging visuals and animations, you’ll learn how to boost your PowerPoint skills and create attractive presentations quickly and confidently.
Whether you’re preparing for a business pitch, a training session, or any other presentation, mastering fast and effective PowerPoint slide design will save you time while delivering impressive results. Let’s dive in!
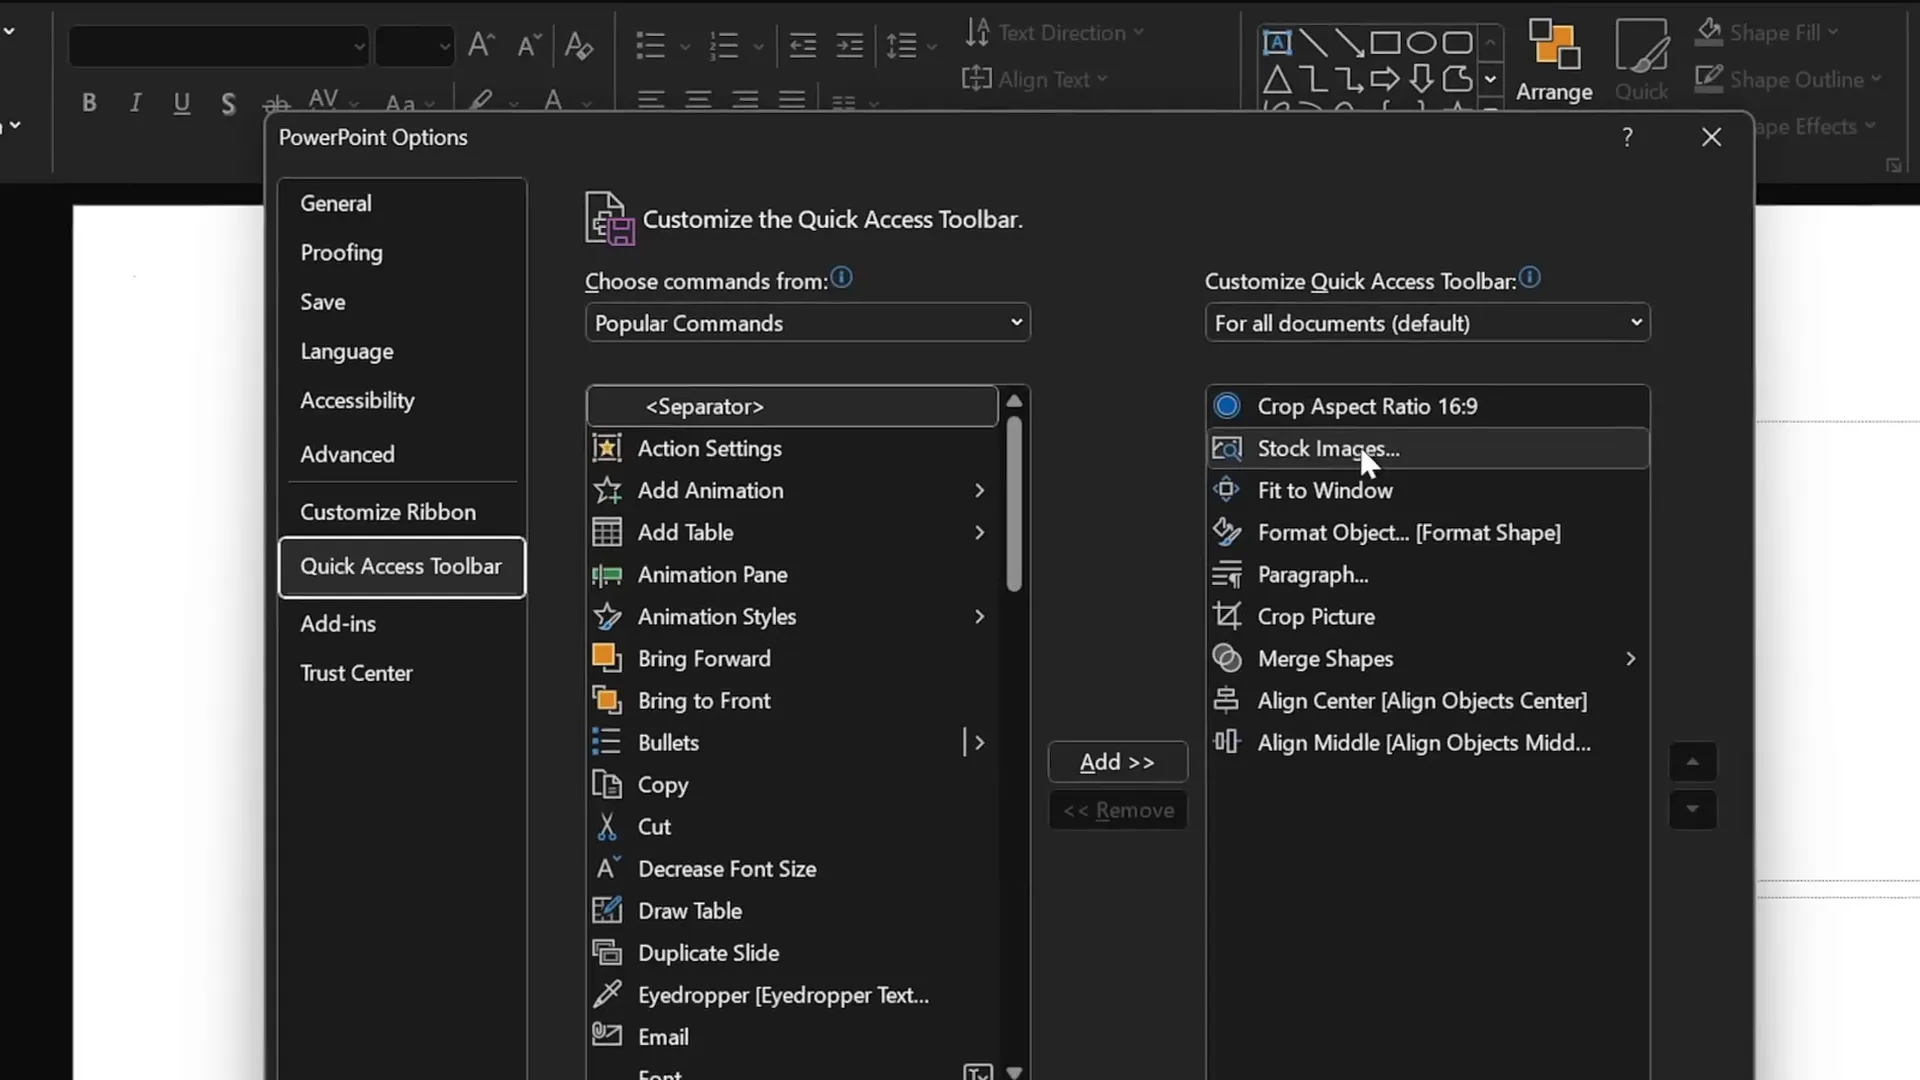
Table of Contents
- Setup: Customizing Your Quick Access Toolbar for Speed
- Slide 1: Designing a Gamer-Themed Slide with 3D Animation
- Slide 2: Using a Full-Screen Looping Video Background
- Slide 3: Crafting a Glassmorphic Effect Slide
- Slide 4: Business Model Slide with KPIs and Image Masking
- Slide 5: Infographic Process Slide with Icons and Circles
- Adding Transitions and Animations
- Final Review: The Completed 5 Slides
- Frequently Asked Questions
Setup: Customizing Your Quick Access Toolbar for Speed
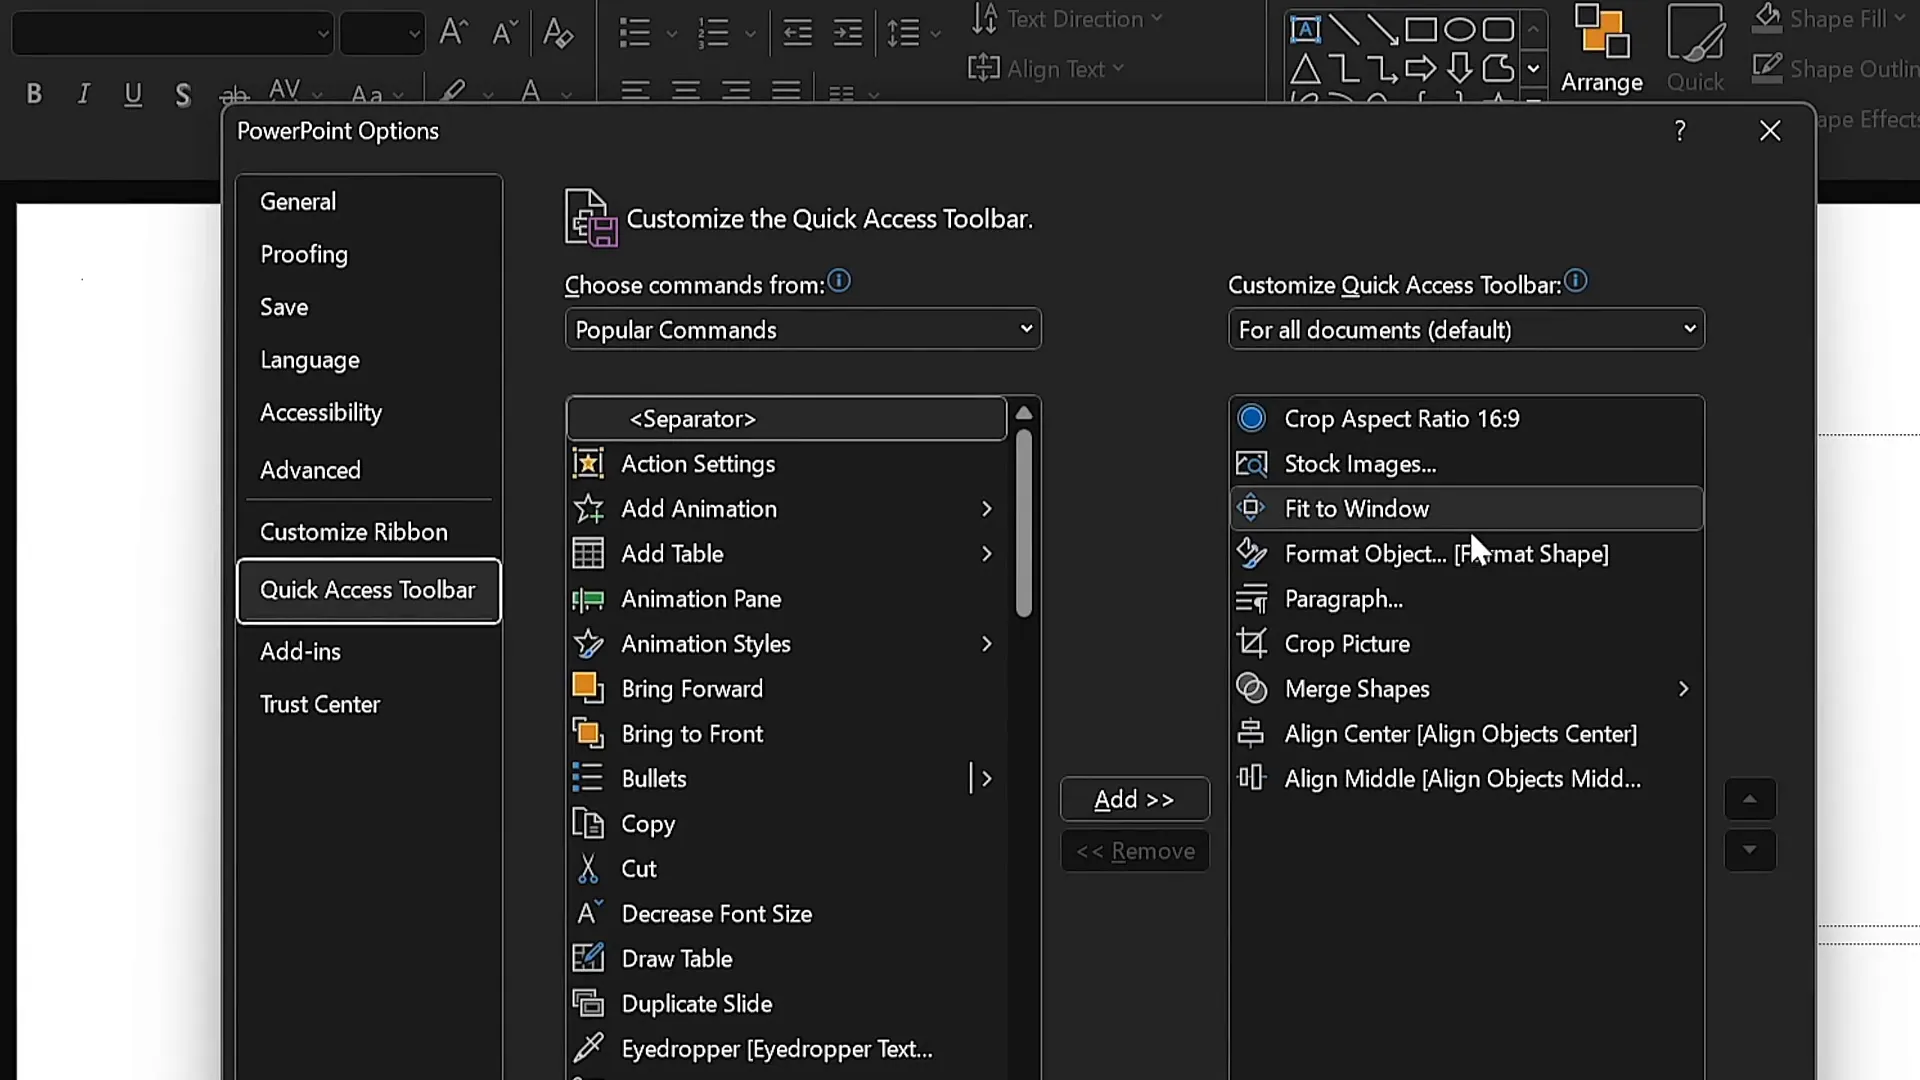
Before starting to design, setting up your PowerPoint environment for maximum efficiency can save precious seconds—especially when working against the clock. One of the best ways to do this is by customizing the Quick Access Toolbar with your most frequently used commands.
Here’s how to optimize your toolbar for rapid slide creation:
- Identify key commands: Add commands such as Insert Stock Photos, Format Shape Pane, and selection tools.
- Use keyboard shortcuts: When you hold the Alt key, small numbers appear over each toolbar icon, allowing you to quickly access commands by pressing Alt + number. This eliminates time-consuming mouse movements.
- Streamline your workflow: With this setup, inserting images, formatting shapes, and manipulating slide elements becomes almost instantaneous.
For example, pressing Alt + 2 opens the stock photo browser, while Alt + 4 brings up the format shape pane immediately. This setup is a game-changer when working fast.
Slide 1: Designing a Gamer-Themed Slide with 3D Animation
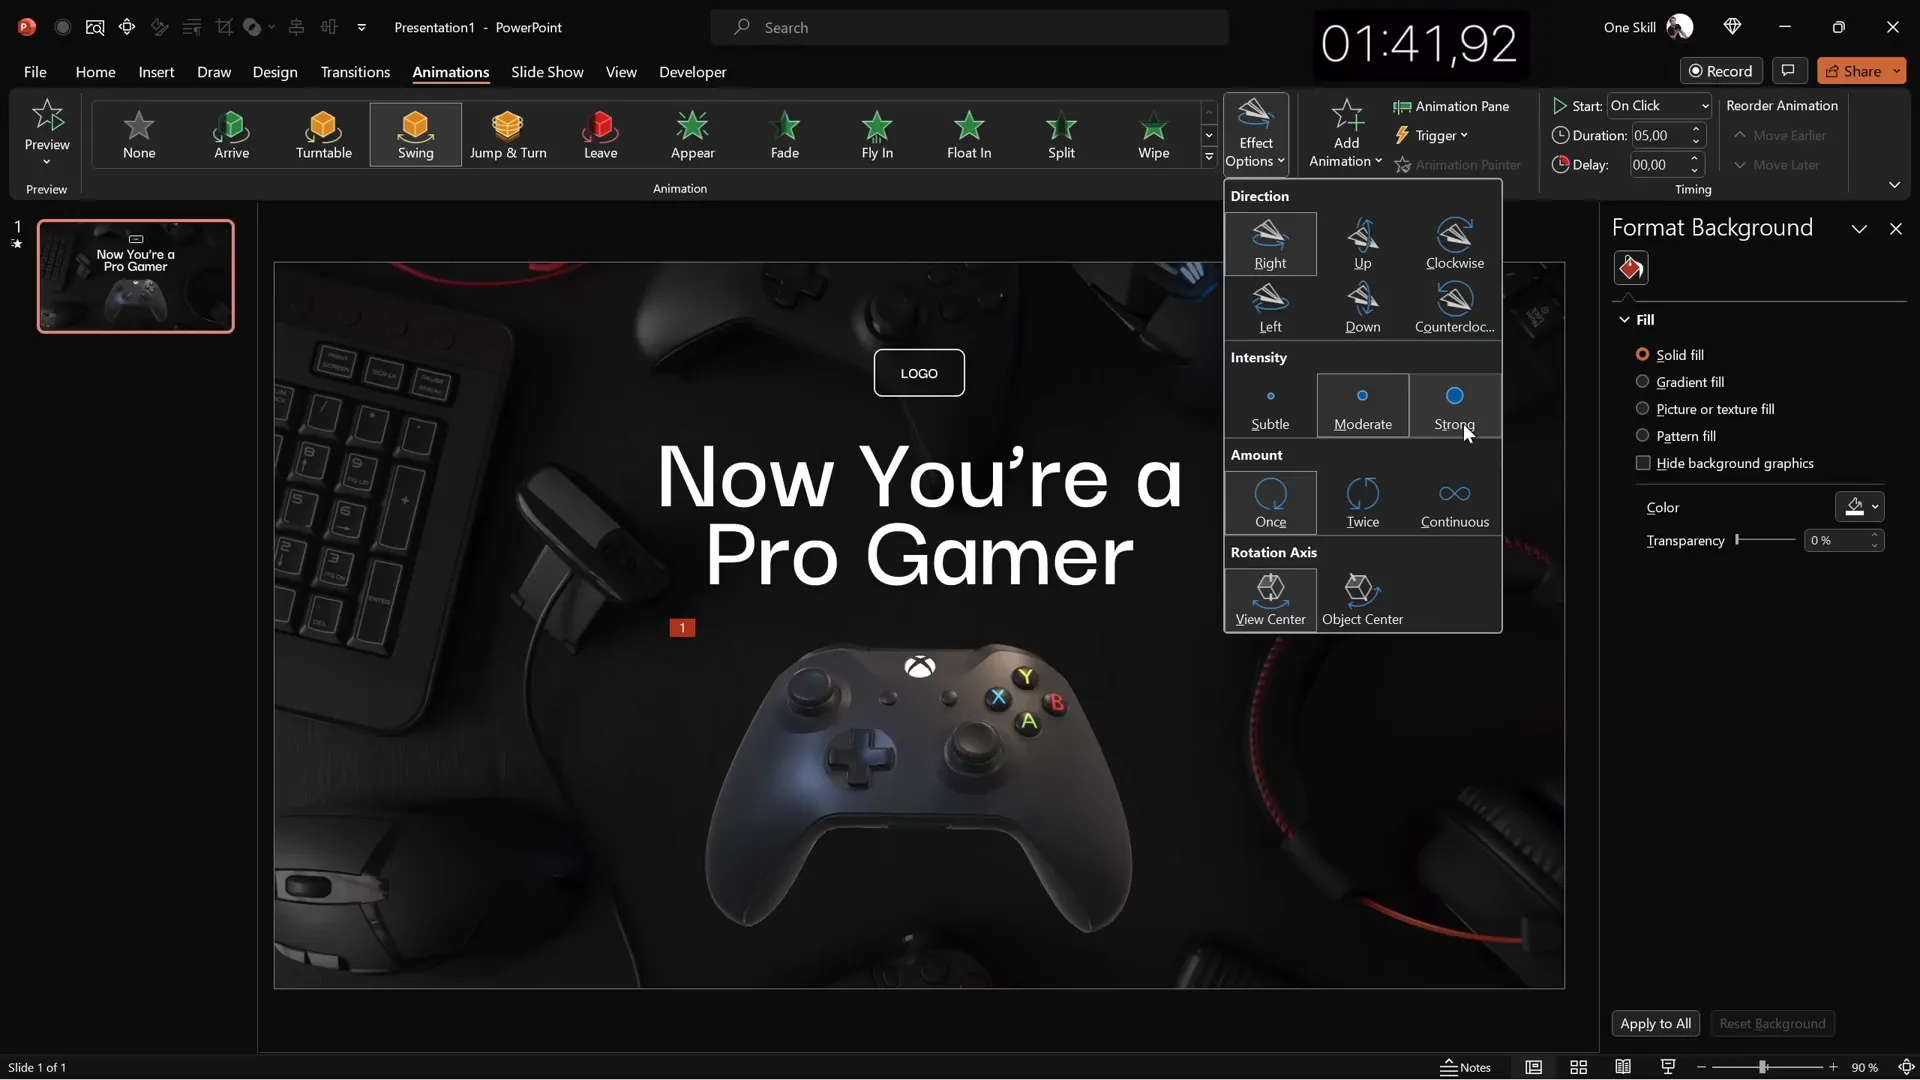
Let’s start by creating a bold and dynamic slide inspired by gaming culture. This slide will feature a dark background, a striking title, and an animated 3D model to grab attention.
Step-by-step process:
- Open Slide Master view: To set your slide’s foundational style, choose a new color palette and a bold font pairing. For this slide, the “Darker Grotesque” font in semi-bold weight works beautifully.
- Select a blank slide layout: This gives you a clean canvas.
- Insert a stock photo: Pick a visually striking image that fits the gaming theme. Resize and crop it to fill the entire slide background.
- Adjust photo brightness: Decrease the brightness by 50% to make white text pop against the darker backdrop.
- Add the slide title: Type “Now you are a pro gamer” in white, increase font size to around 80 pt, and adjust line spacing to 0.6 for a tight, impactful look.
- Create a simple logo: Use a rounded rectangle shape with transparent fill and a 1 pt white outline. Type “logo” inside with the same font.
- Insert a 3D model: Search for a “controller” model with a dark color scheme. Position it near the bottom and apply a strong swing animation starting with the previous slide, lasting 3 seconds.
- Balance elements: Adjust the positioning of text, logo, and 3D model for a harmonious layout.
This slide’s combination of dark tones, clean typography, and subtle animation creates a modern, professional look that’s perfect for gaming-related presentations.
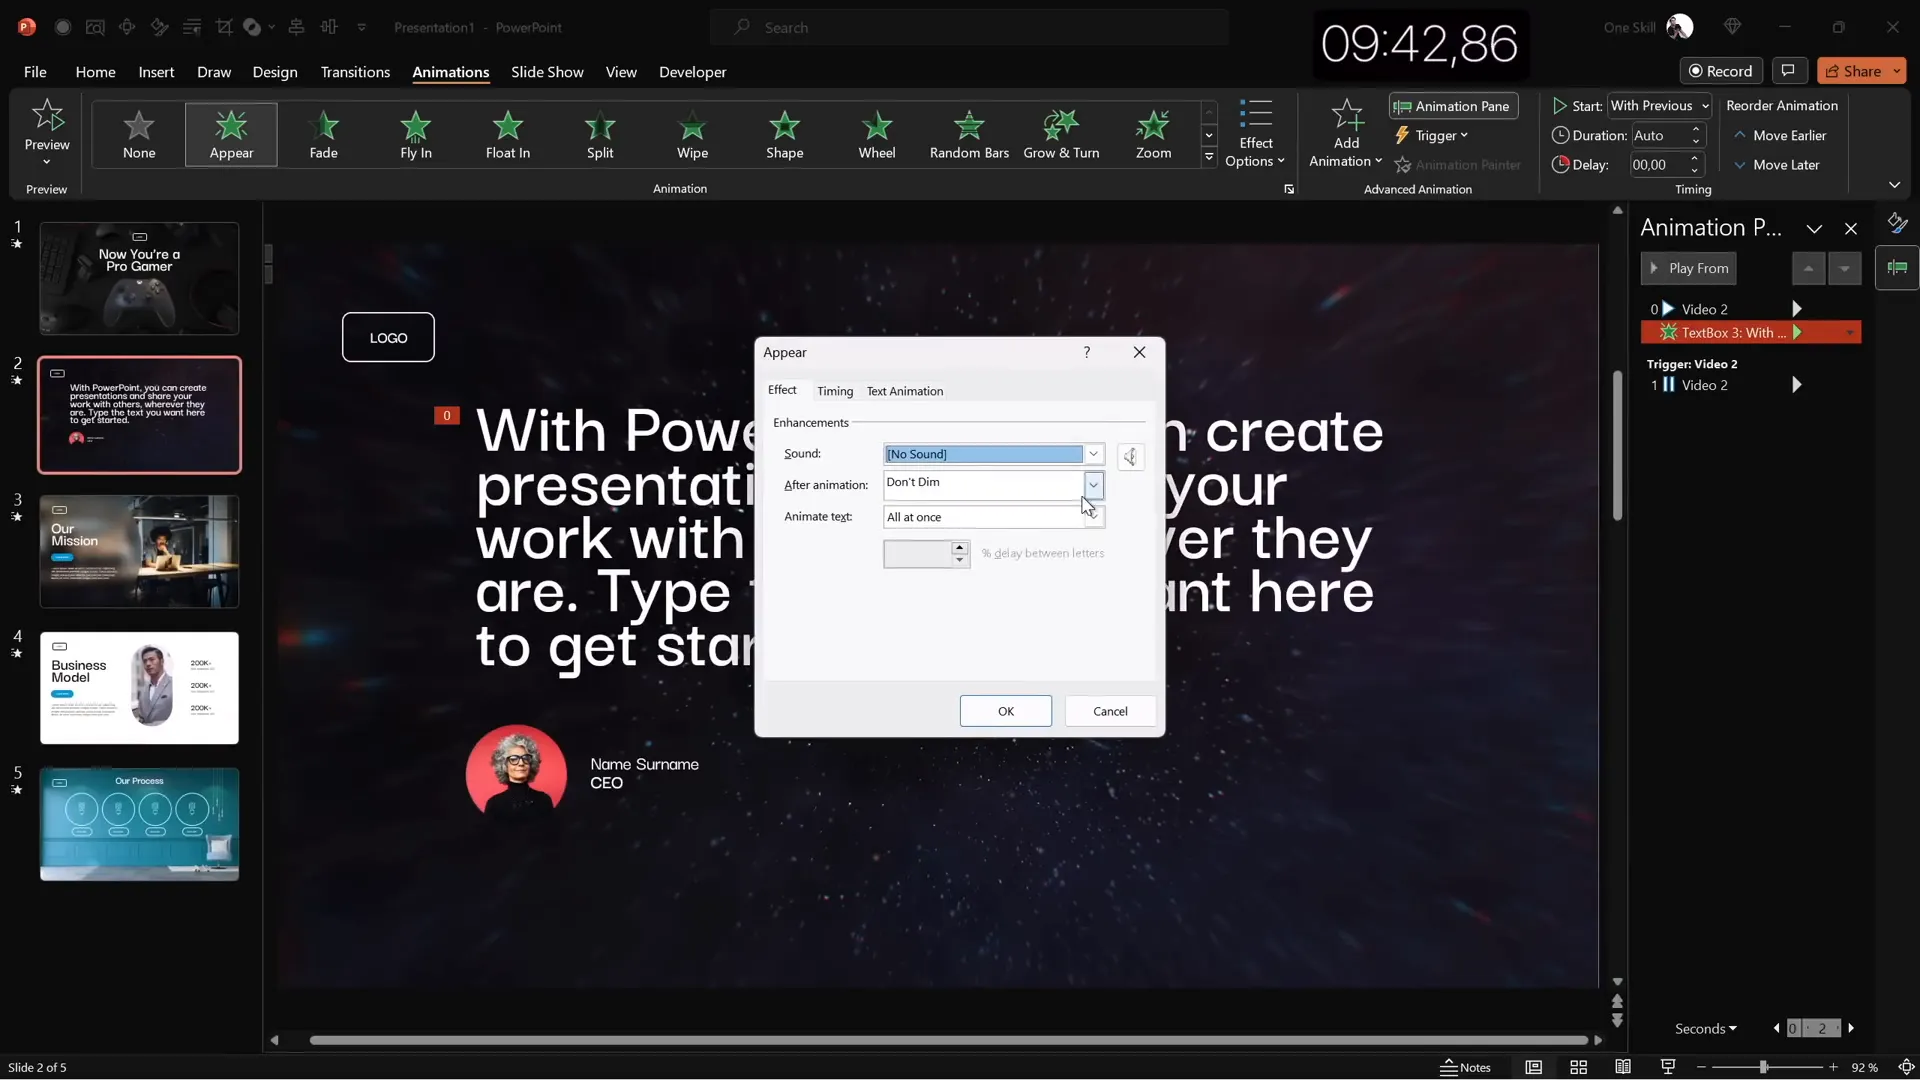
Slide 2: Using a Full-Screen Looping Video Background
Next, let’s build a visually immersive slide using a full-screen looping video as the background. This technique adds motion and energy without distracting from your message.
How to create it:
- Insert a looping video: Search PowerPoint’s stock videos for a dark, abstract loop that fits your theme. Insert and stretch it to cover the entire slide.
- Reuse elements: Copy the logo and slide title from slide one to maintain consistency.
- Adjust title alignment and size: Align the title to the left and reduce font size slightly to enhance readability.
- Add a text passage: Copy text from a template or use your own quote. Center align it and maintain the same font style and size for coherence.
- Insert a portrait photo: Add a small circular headshot below the text to attribute the quote or highlight a speaker.
- Add a caption: Below the portrait, include a text box for the person’s name, surname, and job title (e.g., CEO), formatted with a smaller font size and medium font weight.
This slide is perfect for sharing impactful quotes, testimonials, or speaker highlights, with the video background adding a dynamic touch that keeps viewers engaged.
Slide 3: Crafting a Glassmorphic Effect Slide
The third slide explores the trendy glassmorphic design style, which combines blurred backgrounds and translucent elements for a sleek, modern aesthetic.
Steps to achieve the glassmorphic look:
- Insert a high-quality photo: Choose an image of a late office working environment that fills the slide.
- Create a blurred background: Duplicate the photo, apply maximum blur, copy it to clipboard, delete the duplicate, then paste the blurred image as the slide background for a soft, out-of-focus effect.
- Insert a large circle shape: Position it on the left side and fill it with the slide background fill color to create a translucent panel.
- Remove outline: Ensure the circle has no border for a seamless look.
- Reuse logo and title: Copy the logo and title from previous slides and align them to the left. Change the title text to “Our Mission.”
- Add body text: Use the
=lorem(1)formula in PowerPoint to quickly generate a paragraph of placeholder text. Set font size to 16 pt and apply a line spacing of 0.8 for readability. - Create a call-to-action button: Reuse the logo shape, expand its width, and label it “Learn More.” Fill it with a vibrant color, remove transparency, add no outline, and apply a blurred shadow matching the button color for depth.
- Use alignment guides: Turn on light guides to center and balance all elements precisely on the slide.
This slide is an excellent choice for mission statements or key messages, combining clean typography with a visually appealing glassmorphic effect.

Slide 4: Business Model Slide with KPIs and Image Masking
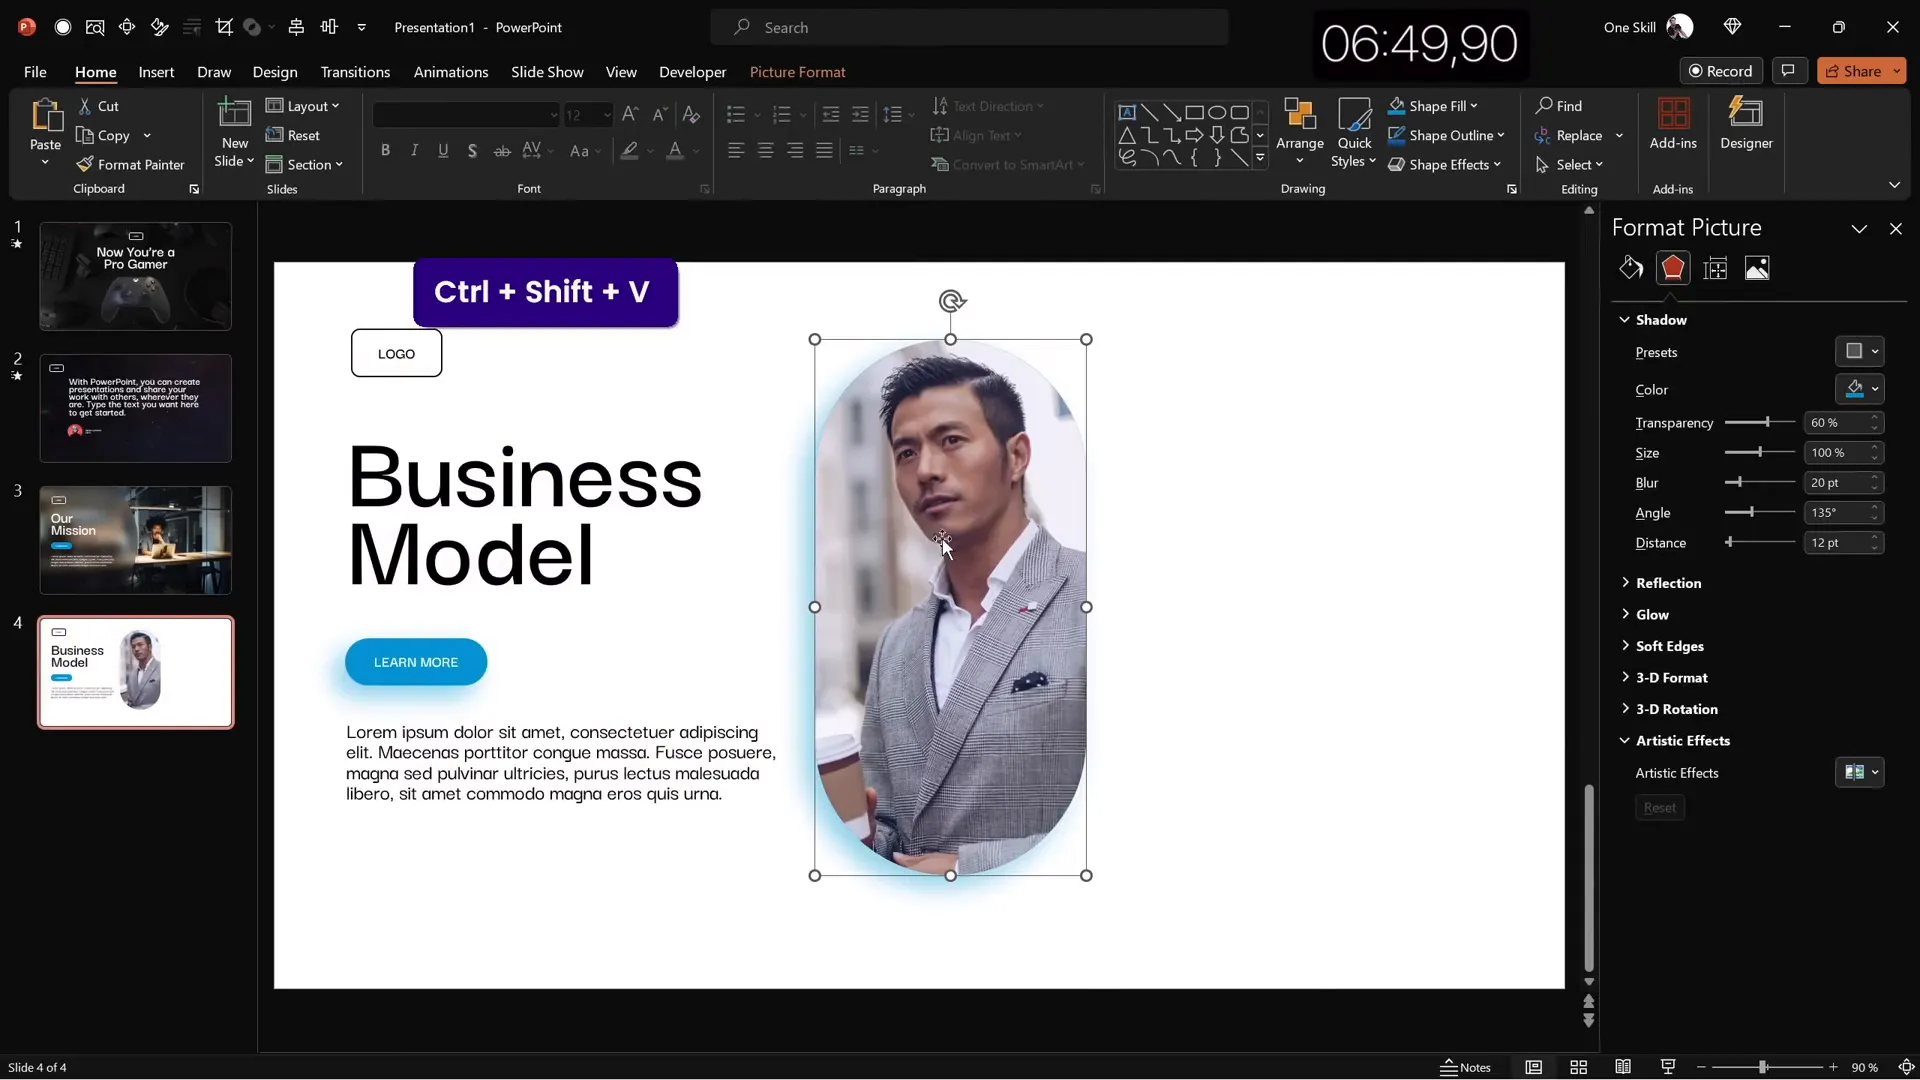
For the fourth slide, we’ll combine a compelling image placeholder with key performance indicators (KPIs) to communicate important business data clearly.
How to build this slide:
- Reuse glassmorphic elements: Copy all elements from slide 3, change text color to black for contrast, and adjust outlines accordingly.
- Change title: Update the slide title to “Business Model.”
- Insert an image placeholder: Add a large rounded rectangle in the center. Fill it with a photo of a man holding a coffee cup from stock images.
- Mask the photo: Select the photo and the shape, then use the “Merge Shapes” > “Intersect” command to crop the photo into the rounded rectangle shape.
- Add shadow effect: Copy the blurred shadow from the button and apply it subtly to the photo for depth.
- Add a white outline: Apply a thin white border (3 pt) around the photo for a polished finish.
- Create KPIs: Add text boxes for KPIs on the right side. Use a smaller font size (16 pt) and lighter gray text for descriptions.
- Group and duplicate: Group each KPI’s title and description, then duplicate to create three KPIs evenly spaced vertically.
- Align everything: Use alignment tools to center the KPIs and balance the photo and text on the slide.
This slide layout is ideal for presenting business models, performance metrics, or any data-driven content with a clean, professional look.
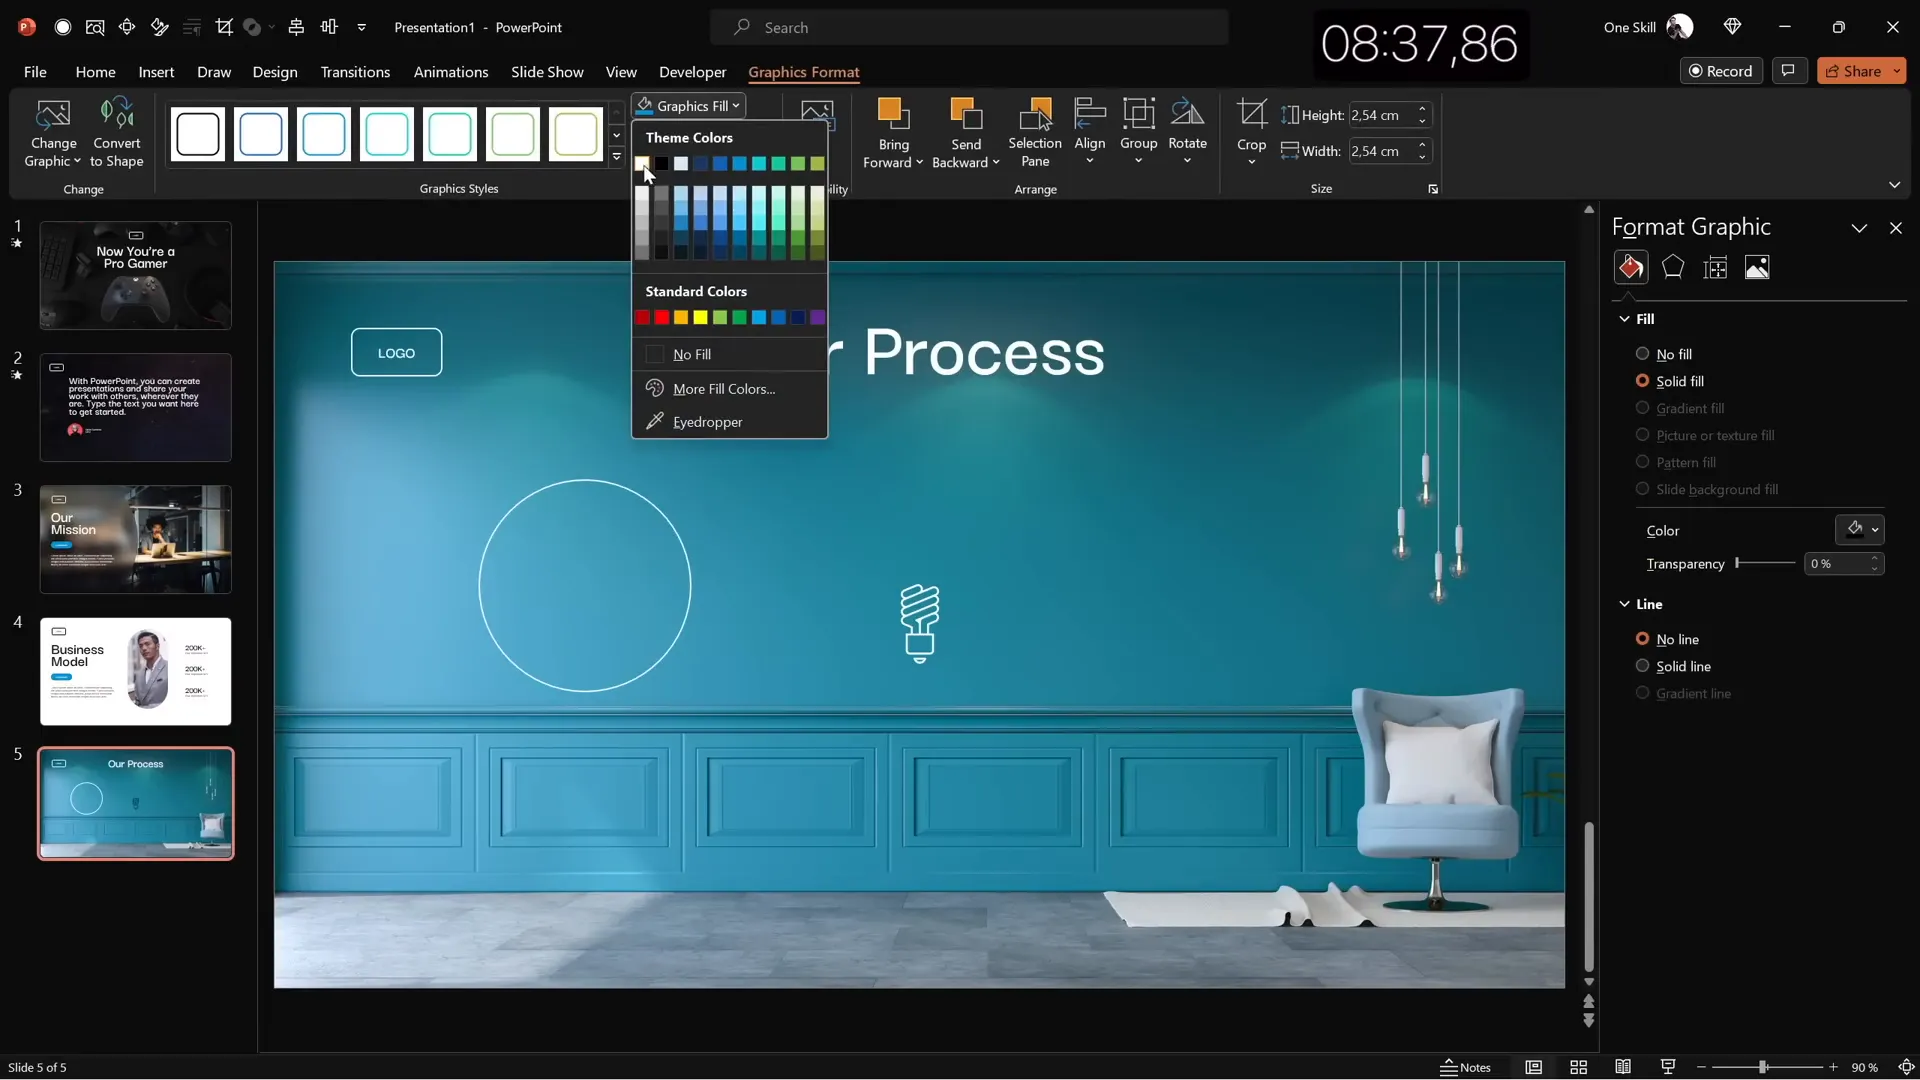
Slide 5: Infographic Process Slide with Icons and Circles
The final slide is a simple yet effective infographic illustrating a process in sequential steps using circles and icons.
Designing the infographic slide:
- Insert a full-screen background photo: Choose an image with a textured wall or neutral background to serve as a canvas.
- Copy elements: Reuse the logo and slide title from previous slides, updating the title to “Our Process.”
- Create circles: Insert circles styled similarly to the logo shape—transparent fill with white outline.
- Add icons: Search for relevant icons (e.g., a light bulb) and place them inside the circles. Set icon color to white for contrast.
- Label steps: Add text boxes inside or below the circles to indicate step numbers and descriptions.
- Group and duplicate: Group the circle, icon, and text, then duplicate to create four steps.
- Distribute horizontally: Use PowerPoint’s distribute feature to space the steps evenly across the slide.
- Adjust spacing: Modify the slide title size or positioning to ensure all elements fit comfortably.
This slide works well for explaining workflows, processes, or sequential information in a visually engaging way.
Adding Transitions and Animations
To polish your presentation, adding transitions and animations enhances flow and engagement. Here’s how to apply them effectively in a time-sensitive context:

- Slide transitions: Use the “Uncover” transition for slides 2 through 5 to create smooth visual shifts. Apply a “Fade” transition on the first slide for a gentle start.
- Text animation: Add an “Appear” animation to the main text box on slide 2. Set it to start with the previous slide and animate by letter with a delay of 0.03 seconds per letter for a dynamic effect.
- Group animations: Group multiple elements (e.g., KPIs or infographic bubbles) and apply a “Fly In” animation to bring them into view simultaneously.
- Timing: Keep animations short and smooth to maintain the pace, especially when working within a tight timeframe.
Animations and transitions, when used thoughtfully, add professionalism and visual interest without overwhelming your audience.
Final Review: The Completed 5 Slides
After ten minutes of focused work, here’s a summary of the five slides you’ve created:
| Slide | Description | Key Features |
|---|---|---|
| 1 | Gamer-themed slide | Dark background, large white title, 3D animated controller, simple transparent logo |
| 2 | Looping full-screen video slide | Dark abstract video background, left-aligned title, centered quote, circular portrait photo |
| 3 | Glassmorphic effect slide | Blurred background, translucent circle panel, mission statement, vibrant call-to-action button |
| 4 | Business model slide | Masked photo placeholder, KPIs on right, black text, subtle shadows and outlines |
| 5 | Process infographic slide | Full-screen photo background, four steps with circles & icons, evenly spaced layout |
While some slides may lack final polish or additional animations due to time constraints, each slide is fully functional and visually compelling. You can always customize text, icons, and layout further based on your specific needs.
Frequently Asked Questions
How can I speed up my PowerPoint slide design process?
Customizing the Quick Access Toolbar with your frequently used commands and mastering keyboard shortcuts like Alt + number for quick access drastically speeds up your workflow. Planning your slide structure ahead and reusing elements also helps save time.
What is the glassmorphic effect and how do I create it in PowerPoint?
Glassmorphism is a design trend that uses blurred backgrounds and translucent panels to create a frosted glass look. In PowerPoint, duplicate your background image, apply a strong blur effect, and use shapes with background fill and no outline to create translucent areas.
Can I add videos and 3D models directly in PowerPoint?
Yes! PowerPoint allows you to insert stock videos and 3D models through the Insert tab. You can search for specific 3D objects or videos and add animations to them for dynamic presentations.
What fonts work best for professional PowerPoint slide design?
Choosing clean, modern fonts like “Darker Grotesque” in semi-bold or medium weights ensures readability and a professional look. Avoid default fonts like Calibri or overly decorative fonts that may distract from your content.
How do I ensure my slides are visually balanced?
Use PowerPoint’s alignment guides and light guides to position elements precisely. Group related objects and distribute them evenly to maintain consistent spacing and alignment across the slide.
Where can I find templates and resources to improve my PowerPoint slide design?
There are numerous online resources offering free and premium PowerPoint templates. Using templates can provide inspiration and save time. Additionally, exploring tutorials and courses on slide design and animation can enhance your skills.
Conclusion
Mastering PowerPoint slide design doesn’t require hours of painstaking work. With strategic planning, quick access toolbar customization, and a focus on essential design principles, you can create five beautiful, professional slides in just ten minutes. This approach not only saves time but also helps you develop a consistent and polished presentation style.
From dynamic 3D animations to immersive video backgrounds and trendy glassmorphic effects, these techniques elevate your presentations and captivate your audience. Remember to keep your slides clean, balanced, and aligned with your message for maximum impact.
Practice these methods, experiment with different layouts and multimedia elements, and soon you’ll be designing stunning PowerPoint slides faster than you ever imagined.
Stay creative, stay efficient, and happy designing!
Check out the full video: 5 SLIDES in 10 Minutes!🔥TUTORIAL🔥


